Getting a wireless keyboard that can be used with 3 devices side by side might not mean a lot for many but is a blessing for someone who uses dual devices for work. if you don’t know dual device connection is achieved by using Bluetooth as a USB adapter, which means it is available in premium wireless keyboards.
Usually, the dual connection is seen on keyboards over 2000 Rs. Two great alternatives are the HP 350 and Logitech K480 if you can stretch a little.
Portronics saw an opportunity and grabbed it! So did they just pump up the features or the product is actually good? Should you buy it? Is the Portronics Bubble wireless keyboard worth it? Let’s learn more about it in the Portronics Bubble Keyboard Review!
if you are here for the first time, welcome to PadhkeDekho.
At PadhkeDekho, we buy tech products, use them for at least 1 month, and then share our review or comparison. This gives our readers insights that help them buy a product confidently or make an even better-informed decision.
Readers like you support us. Any purchase using the Amazon links on this page will help us earn a little commission. Be assured you will not be charged a penny extra! This motivates us to keep on doing what we’ve been doing for the last three years! Thanks for the support!
With that said, let’s have a look at the pros and cons.

PROS
- Compact & practical tiny keyboard
- Can pair 3 devices and switch is easy
- Typing is silent
- The size is perfect for portability
- Overall built quality is decent
- Key travel is good
CONS
- Some keys are hard to press
- No batteries in the box
Some Major Specifications
| Feature | Value |
|---|---|
| Batteries Required | Yes, 2 AAA (Not Included) |
| Bluetooth Connections | 2 |
| USB Dongle Connection | 1 |
| Warranty | 1 Year |
| Weight | 260 Grams (Approx) |
| ON/OFF | Auto |
| Product Size | 287 X 128 X 21 mm |
| Compatibility | Windows, Ubuntu & Mac (Tested) |
| Best Buy Link | Amazon |
Box Contents

Like any budget keyboard, this unboxing is nothing special. Instead of plastic wrapping inside, Portronics gave a silicon packing which is a nice touch. I don’t know why Portronics does not provide any seal to their packaging. It’s our 5th purchase and none had a seal on it.
How Tuff is the Keyboard?
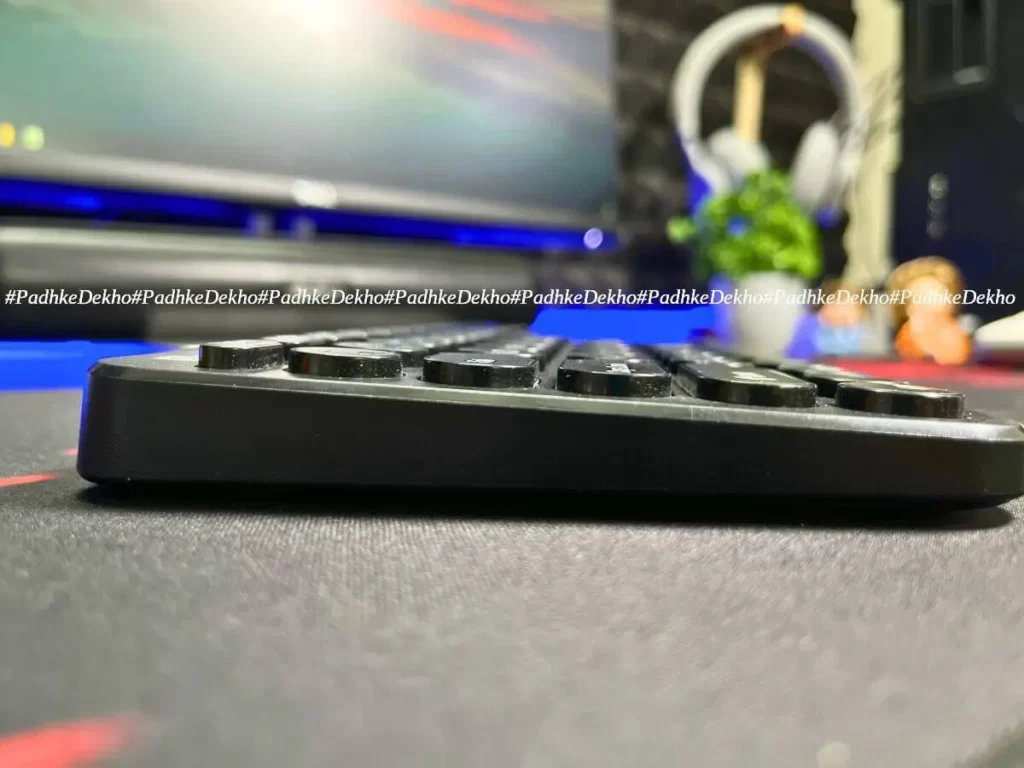
If you are wondering if it’s a budget keyboard it will have a flimsy design and keys, you wouldn’t have been this wrong. It’s better than many wired keyboards from top brands like Dell and HP! Even we were not expecting this.
You will not experience any panel squeaking or weird flexes even though the complete build is of plastic. Even if you apply force, it will not move an inch. Keys are quite similar too. They do not wobble or feel cheap while working. Portronics claim of “luxurious quality” is appropriate.
Hence for built quality, Portronics Bubble gets 8/10.
Does it Look Good on the Table?

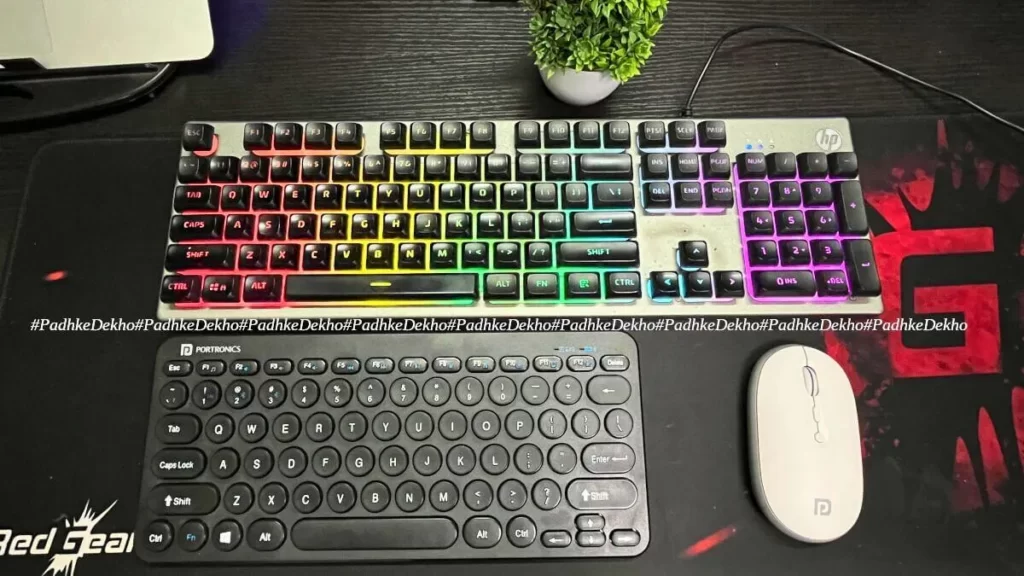
Yes, it does look good on the table. For customization it comes in two colors; White and Black and we went with the latter as a white keyboard does attract dust and cleaning is not our department 😁.
The overall design is matte which is the reason why it looks good. The only shining elements are the key imprints, which are shiny as a result if your wall LED light is just above the keyboard then you will experience some visibility issues.
As far as the looks go, from the sides you have a few raised keys that visually improve. So for looks, Portronics Bubble gets 9/10.
Before going into the button’s feel and feedback, here’s who exactly this keyboard is for!
Who is it For?
Portronics bubble keyboard is for someone who travels and writes as a hobby or job on a physical keyboard. It’s compact and lightweight making it essential to keep with your laptop or tablet for a better typing experience than a touch keyboard.
The second use case scenario will be at home or office where you have to juggle between 2 or 3 devices. I know how frustrating it can get and a connected keyboard helps a lot. Not just that, helps to clear our table space as well.
For an even better experience, you can also pick u Portronics TOAD 2 Wireless mouse, it can also connect to 3 devices (2 Bluetooth and 1 USB Dongle). Here’s our detailed review of that.
Another reason can be the multimedia controls. We’ve used a few keyboards in the pact which even did not have a dedicated volume control and that’s not a good user experience.
On this keyboard you get all the major features on the Function keys like Open Music app, Reduce volume, Increase Volume, Mute, Play Prevois Trak, Play, Next Track, Play or Pause, Stop, Home, and Email.
With these features in mind, the Portronics Bubble Multimedia Keyboard gets a 9.10.
How’s The Typing Experience?

If you are buying it for professional writing as a hobby or work from home then it’s not the ideal choice. There are better “keyboards” for typing like the Dell KB216 (wired) or HP K160 (wireless) are better options. But hey, they are big as well as a little cumbersome to carry around.
Being compact and always flat to the table does bring its advantages and typing is not one of them. It’s not bad but certainly not the best either.
is your current keyboard an RGB membrane or a mechanical keyboard? To get your hands on it perfectly, you will need to use it for a few days. Because the keys are small and key travel is less. For casual typing, it’s going to be fine though!

The brand claims to offer “soft and silent keys” but it’s not like that. Sure, if you are habitual of using mechanical keyboards then yes you will find them quite silent.
Why it’s not going to be silent? Because the keys are a little hard to press. You will need to apply some force or press them hard. One suggestion to you. While typing, aim for the center and avoid corners it will not press completely and words will be missed. This is more evident on the left Shift and right Shift.
So the typing experience is decent not the best neither very bad. At least it does not omit words while typing.
Therefore, the Portronics Bubble Multimedia Keyboard gets a 7/10.
How to Connect Three Devices to Portronics Bubble Multimedia Keyboard?
The back of the keyboard has a panel that holds 1 USB dongle as well as space for 2 AAA batteries (not included).
You will need to insert this USB dongle in 1 of your devices. Let’s say you use 3 devices namely PC, Laptop, or Tablet/Mobile then, insert this into the PC as it will be stationary you don’t need to take it away anyway! 1 of your devices will be connected as soon as you plug the dongle in.
For the other two devices, you will make the connection via Bluetooth. For that, turn on the device that you like to pair first. To put the keyboard into pairing mode, Press the FN+2 where “@” as well as the Bluetooth Logo are printed. The moment you press the combination the LED on the top right of the keyboard turns Blue and keeps on blinking.
Once that is done, the commands from the keyboard are done. Head over to the target device and you will see “Bubble 3.0” in the Bluetooth devices. With just one tap, the device will be connected.
For the second Bluetooth device, the above procedure remains the same instead of pressing the FN+2, you will press the fn+3. And that’s about it.
How to Use Portronics Bubble Keyboard With a MacBook?

Since it’s a budget wireless laptop that supports multi-device connection they omitted putting a cmd or command button which would’ve helped people planning to use this keyboard with a MacBook. Does this mean, you will not be able to use it with a Mac? No! You can use it.
Just keep this trick in mind. The key left to the spacebar on your Mac is a command key or cmd key. On the Bubble keyboard, it’s “Alt”. Both work the same. Now, left to the command button on Mac you have the “option” key which is the Windows or the “Start” key on this keyboard. Both work the same.
This will take some time to get used to but will save some money too!
How to Switch Between Devices?
As all the devices are paired, how will you cycle between them? No problem, that’s why we are here! All three devices are accessible by the three key combinations; Fn+1, Fn+2, and Fn+3.
Fn+1 is for the device which is connected via the tiny USB nano receiver. The moment you press, the left LED on the top right of the keyboard will first start blinking Red (as it’s forming the connection) and then it will be constant for a moment and then disappear, meaning the connection is established. It will happen within 2 seconds!
Fn+2 is for the second device or first Bluetooth device. Once you press the combination the right LED on the right side of the keyboard will blink Blue and then become constant before vanishing. This confirms the pairing is done. If it keeps blinking, the paired device is not turned on or out of range.
FN+3 is for the third device or the 2nd Bluetooth device. The process remains the same as Fn+1.
We liked the switch mechanism it’s instant and helps to pace up and easy on the table as well as the pocket (monetary wise).
Should You Buy Portronics Bubble Multimedia Keyboard?

Now who should buy it? Well, it’s very simple! If your work needs a multi-device connection wireless keyboard to add speed and convenience then Portronics Bubble is a great keyboard under 1000 Rs. You cannot get such features and built quality in this price range. In other words, it can’t get better than this.
But if you are a casual user who does not care about 3 devices connected or a compact design or even a wireless connection then this is not the one for you. You can consider checking out the Dell KB216 [Review] (wired) or HP K160 [under testing] (Wireless option)
To sum up, the Portronics Bubble Wireless keyboard is a good one and worth the price. Padhkedekho recommends.
Wrapping Up!
There ou have it folkes! This was PadhkeDekho’s Portronics Bubble Wireless Keyboard Review after 1 month of testing. if you have any questions you can always comment below or ping us on the social accounts mentioned. We love to help as much as we can.
For quick interaction, you can Telegram us on id: “padhkedekho” without quotes.
Related Product Reviews!
- Amkette Ergo View Laptop Stand Review! Justifies the Price?
Looking for a good quality laptop stand under 1000 Rs? Then do check out our Amkette Ergo View Laptop Stand Review after 1 month of use! Tap! - Amkette Optimus XL Review | All Show or Useful Features?
A full size wireless keyboard with 4 device support? Interested? Here’s Amkette Optimus XL Review after 1 month of testing. Tap now! - STRIFF Laptop Stand Review | 7 Pros & 2 Cons! 7 Month Later!
Looking for a laptop stand to enhance your health along with your laptop’s life? Here’s the STRIFF Laptop Stand Review after a month of use. - HP 250 vs Logitech M170 | Best Wireless Mouse For You?
Under 1000 Rupees you can find many wireless mice from top brands like Dell, HP, Logitech, Lenovo, etc. But HP and Logitech are the most popular choices. For instance, on Flipkart, Logitech M170 has 4.5 ratings just like HP 250. This was also one of the reasons I bought the Logitech M-170, 1 year ago. After using it for such a long time I’ve also shared my 6 months review for it. Also, we bought HP 250 which is also a wireless mouse (Review). In this article, I am doing an HP 250 vs Logitech M170 comparison to tell you which is the better deal. Not only that but which one is ideal for what type of user? So without anything else, Welcome to PadhKeDekho, and let’s get started! Update: Both mice are available at a huge discount on Amazon’s sale. Click now and check out the deals! Hey There! Welcome to PadhkeDekho. Here we buy tech products and use them for at least a month before sharing the review of comparison. It gives readers like you insights that help you choose better. As we are supported by the readers. Buying anything using the Amazon links will help us earn a little commission at no additional cost to you. This motivates us to do what we have been doing for the last 3 years. Thanks for the support. HP 250 Vs Logitech M170 Differences Which One Has Better Built Quality? Both the mice are completely made up of plastic. But the quality of plastic is different. It is an HP 250 that has a better build. You will not find a single squeaking even when you press it very hard. This is the second mouse from HP that I’ve owned and also used dozens in my college days so it goes in their tradition! With any HP mouse, you can be less worried about its quality. It’s not like the Logitech 170 has a poor build. It’s just HP feels more solid in the hand. I’ve used the Logitech 170 for 6 months I never felt anything bad about the built quality. But switching to HP has shown the difference. Considering a price difference of a few hundred rupees, unmistakably go with HP 250 if the built quality is your topmost priority. Look and feel (Design) To be honest, in terms of design, Logitech M170 feels like a 20th-century mouse! Whereas, HP 250 seems like from the future! This futuristic look might have a love-it-or-hate-it kind of first impression. However, I loved the design of the HP 250. Logitech M170 has a textured finish all around the sides except the area where your palm will rest. This texture helps to enhance the grip of the thumb, palm, and pinky finger. But here’s a thing you should know. If you have a small or medium hand size then it will be very comfortable. But it might not work its magic on large hands since it is a compact form factor mouse. A regular mouse has an arc design however this one has a slanting curve. This slating curvature adds comfort while using it for an extended period of hours. Whereas, HP 250 has an inward design on both sides. This inward design and full-size form factor take comfort to the next level. Your thumb, palm, and pinky finger will have the best comfort. I am writing this after using the mouse for more than 12 hours continuously, so you can understand! Now let’s talk about comfort in detail. Daily, I work around 12 hours and I had no issues using any of them for such extreme working hours. So who would not like being more comfortable? Therefore, it’s the HP 250 that is better than the Logitech M170 in terms of sheer comfort. Usability Both the mice have smooth and responsive buttons. Even the scroll wheel works well. So at this point, if you buy any of these you will not miss anything for basic tasks. But if you need to take care of advanced photo editing software like Photoshop or gaming then HP 250 is going to be the one for you. Due to size, the HP 250 forms the best grip. Secondly, it supports 3 changeable dpi that allow even better and more accurate responses. As far as the button’s click goes, the buttons are much silent on Logitech M170. Why? Because of the small form factor, the buttons have less travel. Whereas HP 250 is a full-size mouse so the clicks are prominent but it will not disturb you. But if you are concerned about the click response then HP 250 is the clear winner. The clicks are instant. Certainly much faster than the Logitech M-170. Don’t get me wrong, Logitech is also fast but HP is way more swift. Now about the scroll wheel. It is much smoother on Logitech. But there’s also one thing you should know. Do you work on spreadsheets Google Docs or any Word-based document? If yes then HP should have your eyeballs! Though it’s not smooth but is very accurate. Let me explain! Let’s say you are working on a text document and your paragraph is 5 lines long. You need to reach line 5. So rotating the scroll wheel close to you will make it work easily. But on Logitech M170 the scroll wheel works fast so you will cross line 5 or reach line 4 then use the arrow keys to navigate. So in terms of usability, it is an HP 250 any day! But now there’s practicality! Practicality – Which Is Better On The Go? For the best on-the-go experience the mouse has to be tiny so it can be used on the train or flight table and also be lightweight when it’s in your backpack. Both the scenarios can be tick marked by Logitech M170. Being an SUV, the HP 250 next to Logitech needs space! If you are on the go most of the time then Logitech M170 is better. But if you have a computer setup or have space for it to spread out then do grab the HP 250. When I am on the go, I prefer using the trackpad of my laptop. So it doesn’t affect me that much. But it can be a deal maker or breaker for you. HP 250 Vs Logitech M170 Which One Is Best For You? If you are looking for a small form factor and lightweight mouse for your needs be it indoors or on the go then Logitech M170 is the choice for you. Additionally, you will experience quite silent clicks and a smooth scroll wheel. In terms of laser optics, you get an invisible laser instead of red or blue. This helps if you work at night. With HP 250, you get a bigger and more comfortable mouse. Secondly, there are 3 DPI to choose from and make your experience very smooth and fast. As far as the optic laser goes, on HP you get a blue laser instead of red or invisible. In terms of grading from low cost to expensive, it is a red laser that is found on cheap mice. Invisible at moderate prices and blue for the expensive range. Then you get a faster click response so you can use it for your benefit while playing fast-paced shooter or racing games. So with HP 250, you get so many special and practical upgrades for better and more efficient working. But in the end, it all depends on what you are looking for is it a compact form factor or changeable dpi and maximum comfort? For me though, it is HP 250 which checkmarks all the boxes. But I will end with this. Logitech M170 and HP 250 are great wireless mouse choices below 1000 Rupees. Buying any of them and aiming to last a few years is not a difficult task. So all in all, that’s for sure both are great deals for the bucks you will be spending. Wrapping up Hey there, if we were of any help in your decision making then please use the below best buy links of Amazon and Flipkart. This not only motivates us to bring articles like this but also helps us to keep the website up and running at no cost to you! This is it, guys! That’s our few cents on the HP 250 vs Logitech M170 comparison. If you found this helpful then do share it with friends and family so that they should also choose better! Do you have doubts or have suggestions? Then do reach us at PadhKeDekho’s Twitter, Facebook, and Instagram, or comment below. We will get back to you as soon as possible! Just like the above article, we share our 2 cents in the form of reviews, tips & tricks, comparisons, and opinions so do check out those articles. And if you liked the content do share it with your friends and family! Thanks, we will see you at the next one! Suggested Articles! - TP Link AC750 Review [TP Link RE200 Review] | Worth it?
Do you have dead WiFi zones at your home or office? TP-Link AC750 or TP-Link RE200 is a good choice. We bought it a month ago, used it thoroughly and this TP Link AC750 Review will help you decide whether to buy this or the slightly cheeper 2.4 GHz model. What is this for? It is a range extender device that helps improve Wi-Fi strength in homes, offices, and shops where a Wi-Fi connection is weak or non-existent. The biggest advantage it brings is convenience and saving extra money spent on your mobile data. We’ve been using the 2.4 GHz TP-Link range 850RE (Review) for over 4 months. It has been great and serves its purpose. We upgraded to AC750 due to dual-band Wi-Fi compatibility on RE200. So, it’s a useful product. Do you need one? Read the review and make the choice. Welcome to PadhkeDekho, where we buy tech products and use at least a month before sharing a detailed review or comparison. This gives readers like you insights that help you choose a better product. As we don’t do sponsored content whatever you read or watch on our YouTube channel is true from the heart of a customer to a customer. As a support to us, we earn from qualified sales via the Amazon links on the blog. Be assured, you will not be charged a penny extra. Thanks for your continuous love, PadhkeDekho is 4 years old now! With that said, let’s begin the TP-Link AC750 review with the pros and cons. TP-Link AC750 Pros & Cons Pros Cons Good built quality Requires 3-pin plug socket Compact yet stylish design Smaller vertical lights Compatible 802.11 b/g/n & 11ac WI-Fi devices Easy setup process 3 years warranty Supports 2.4 & 5 GHz bands Covarge for about 2000 sq. ft. area (tested) Box Contents The TP-Link AC750 or TP-Link RE200 has very minimalistic packaging. Inside, you will see a cardboard box to hold the device intact and a detailed English setup guide. Please note that there was no seal or taping on the case. We put it here because many people ask us about the seal and originality of a product. With that said, the device we got is original. Built Quality (9/10) We have tested a few budget range extenders under 2000 Rs, and TP-Link impresses quite a lot. If we have to put it in one word, it is great. Even though the device has a plastic body, the panel is quite strong and has no sharp edges. Moreover, it is firm and soft and does not harm the hand when operating. The back holds a 3-pin connector with thick legs that fit into any regular Indian wall socket. Another point to note here is that it does not heat up. The daily temperature in Dehradun (at the time of testing) was about 35 degrees C and no ventilation was provided. Even after 4 hours of use, it will slightly warn that you can keep it on your palm. Note: Since we did the extreme testing we don’t suggest you do the same. At least keep the ceiling fan on! Therefore, in terms of built quality, TP-Link never disappoints and this device is no different. Hence 9/10 for built. TP-Link AC750 RE200 Looks (9/10) Unlike the 2.4 GHz model, this is on the next level. You can see and feel the texture on the front. Secondly, the light’s orientation is changed to vertical lines and smaller, which does not make it highlighted in dark lighting. The overall design is compact and lightweight making it similar to a mosquito-repellent machine! The lights switch between red and green combination and the power button always stays green. We liked the simple yet elegant design with just a small branding on the front. So for looks and design, the TP Link AC750 is perfect and looks good even in the drawing room. Hence, 9/10 TP-Link Wifi Range Extender Setup (Very Easy Setup) The setup process is very streamlined keeping in mind the first-time user. There are 3 methods of initiating the process. The first approach is via the WPS button if your router has it. The second is via the TP Links Teather app which we recommend. The third one is via the web browser. Before starting any method, plug the range extender close to the Wi-FI router. You will need to create on TP-Link account and then select the type of device you have. After that, it will ask you to connect with your WI-FI. This is the beauty of this range extender as it supports both bands you will see both in the settings. Enter your password and make EXT or extension to range for any particular frequency or both if you want. You can create a new password if you want. We choose to keep it the same for convenience. Once everything is done, move the range extension to the weak WI-FI zone. Just make sure the extension is receiving signals from your WI-FI router. It will be reflected on the extender with red and green lights. if it’s red near 2.4 and 5 GHz bands, move the extender a little closer to the WI-FI router. Once all the lights come up on the range extension (it takes about a minute) check your phone and make sure it’s connected to the EXT or extension of the desired network you wish to connect and enjoy better speed and coverage. TP Link AC750 Speedtest We had two major concerns with the TP-Link Wi-Fi Range Extender 5 GHz; range and speed. We didn’t care much about the 2.4 GHz band, as 5 GHz was getting all the attention. So, what kind of upload/ download speed and coverage have we got? Well, let’s first talk about the range of wifi coverage. Our present Airtel router is on the first floor and we barely get any coverage on the ground floor. As per the paper specs, this extender can work up to 200 sq. yd. We bought this range extender to remove the dead wifi zone on the ground floor. After successful installation, we report that TP-Link AC750 or TP-Link RE200 has provided about 95% coverage of the 5 GHz band. Here’s the link to the detailed review video. Since we barely had any WiFi range on the ground floor, here’s the speed test next to the Wi-Fi router on the first floor followed by a speed test just below it on the ground floor, next to the far spot on the bottom floor. Also, notice the WIFI bars to see the coverage. We got 45.4 and 47.1 as download and upload speeds next to the router ( which is the benchmark). Slightly better download speed on the ground floor while upload takes a dip. The 37.8 and 30.7 speeds when we moved a little far on the ground floor. The 23.7 and 18.0 speeds are from a spot that is almost our home. Note: All these tests were conducted while a few devices were connected and using the internet. So to sum up the download, upload speed, and coverage, we are quite satisfied with all the results. Features #1 Mesh Wifi Range Extender: Mesh network technology is a straightforward yet complex type of networking that creates nodes (devices) and those nodes create or expand the network. Whereas, regular range extenders replicate the signals coming out of the router. What does it mean to you? In simple language, TP-Link RE200 or AC750 with its Mesh network makes sure you are connected via the strongest network automatically. With the regular range extenders, you would manually change depending upon the network availability. #2 Compact & Plug and Play Design: The overall structure is compact with a flat design making it slimmer than a Good Night machine (mosquito repellent machine). It’s very lightweight. Since there are no wires it feels neat and not a bulky piece of tech on the switchboard. #3 Smart Signal Detector: The range extender is smart; it shows the strength as “too far from the router” and “strong connection” via the red and green lights. It gives you more control and an overall view of the router and range extender connection status. #4 Dual Band Mode: RE 200 or TP-Link AC750 supports Dual Bands like 2.4 GHz and 5 GHz. 2.4 GHz is widely popular more than 90% of devices run on it. On the other hand, 5 GHz is newer. Which one should you use? If you are close to the WIFI reception then 2.4 GHz will be better because of a stable connection. 5 GHz has better upload/ download speeds & a wider network range. #5: Pro Mode: You can create network profiles connect many nodes (devices), and manage them to become a network manager! Also, you can allow or disallow devices to have network access. In other words, TP-Link AC750 gives you pro-level network control of the broadband connection. Are We Satisfied With The Purchase? Yes, we are quite satisfied and here are the reasons. First, the product comes with a 3-year warranty. On the same note, we have many TP-Link products and have never claimed their service. The second is wifi coverage. We have 3 floors to cover. The Wi-Fi router is on the first floor. Major work is done on the second floor and is taken care of with the LAN cables and the 2.4 GHz range extender that we talked about. This left the ground floor as Wifi dead zones. The TP-Link 2.4 GHz range extender works well on the second floor while this 5 GHz takes care of the ground floor as well as the porch and outside area. The total covered area of the ground floor including the outdoor/ porch is around 2000 sq. yd. Which seems to be perfect for this range extender. if you have a bigger place or multiple floors you can consider TP-Link AC750 or TP-Link RE200 model. Since the network coverage is good the upload and download speeds are quite close to the pack we have chosen. So to sum up, the TP-Link AC750 Wifi range extender is a great solution to kill your dead wifi zones at the office/home/ shop/ showroom. We are very satisfied with it. We are wrapping up! There you have it—the TP-Link AC750 review after one month of testing. If you have any questions, please reach out. We love to help! Related Product Reviews TP-Link AC750 FAQ Question 1: Are TP-Link AC 750 & RE 200 the same? A: Yes, TP-Link AC 750 and RE200 OR RE 200 are the same. Just different names. Question 2: TP-Link AC 750 warranty? With many TP-Link products including the AC750 or RE200, you will get 3 years or warranty from the date of purchase. Question 3: TP-Link AC 750 App Name? Answer: To set up and control the extender you will need to install the Teather app which is TP Link’s app. It’s free to download on Android and iOS. Question 4: TP Link AC750 Dual Band? Answer: Yes, TP-Link AC 750 or RE 200 supports 2.4 GHz and 5 GHz bands for a wider range and connectivity. Question 5: TP Link AC750 Battery? Answer: TP Link AC750 works with electricity no battery is needed. Question 6: TP Link AC750 Coverage? Answer: It’s easily about 2500 SQ Yaads and about 70% coverage on 2 floors. Question 7: What is your TP-Link AC750 extender review? Answer: We are quite satisfied with the speeds and overall coverage with TP-Link AC750 or TP-Link RE200. Here’s the detailed review! Question 8: TP-Link AC750 guide? Answer: This TP-Link AC750 review will be a great guide for you. If not, comment below or reach us we will help you sort your query. - Logitech M170 Review After 2 Years Use | Worth it?
It’s been more than 2 years and the mouse is still going very strong. No sign of aging! The buttons are working fine. Back to review. The demand for computer peripherals has skyrocketed making them the top-selling products on most E-commerce platforms. Especially wireless mice and keyboards. Around 2 years ago, we bought Logitech M170 wireless optical mouse. So in this article, we are sharing the Logitech M170 review after 2 years of use! Update: Logitech M170 is at a heavy discount on Amazon’s Great Freedom Festival Sale. Click now to check the deal! My coverage of the Logitech M170 is going to help you learn about its built quality, battery backup, design, look and feel, size, user experience, gaming performance, and much more! So this article is going to be very important to you. Therefore, without wasting any more time of yours, welcome to PadhKeDekho, and let’s get started! Hey There! If you are new around please hit the red bell icon on the left to be notified of our new coverage. Because we keep on bringing articles like this, tips and tricks, unboxings, and reviews that will help you learn more about the products and make a better choice! Logitech M170 Wireless Optical Mouse Review Logitech M170 Specs Design Unlike regular mice that usually have a curvature in the design, the Logitech M170 wireless mouse offers a slanting curve. This gives it a modern look. I got used to it very quickly and going back to the Hp X500 feels bulky and boring. This is going to be subjective though. I loved the design, in fact, got a few compliments from my office colleagues as well! So it’s a win-win for me! If you have medium to small hands then this is going to be very comfortable even for a complete 8 hours shift or extended office hours. But like me, if you got large hands then you can go with Logitech M190. If I would have known this before buying then could have bought Logitech M190! By large hands, I mean a person who can use a 5.5 to 6-inch screen phone single-handedly. Due to my big hands, I found it a little less comfortable than my HP X500. So if you also have large hands then either go with the above suggestion or compromise a little. Thus in design, I will give it 3/5. Built Quality The built quality of Logitech M170 hard plastic is strong. The buttons are equally good and the same can be said for the scroll wheel. When I was ordering it there were a few reviews saying bad about the scroll wheel. Since I have been using it for 6 months now, the authenticity of the reviews is questionable. M170 has taken a few falls on the ground and ruff and tuff handling as well. Even then, the scroll bar and buttons show no sign of issues. If you avoid eating on your computer table, then I don’t think it will ever go bad that easily. You can feel the weight on the palm side where your hand will be resting. Unlike HP X500 where the weight is all in the center. While we are at it, the weight of the Logitech M170 is 70.5 Grams with a battery making it lightweight and compact making it ideal for work from home. I am more than satisfied with its built quality. There is no squeaking or noise while trying to press the body of the mouse. So I would give it 4.5/5 in terms of built quality. Look And Feel In terms of looks, on the first glance, it doesn’t appear like a regular mouse. Due to the slanting slope, Logitech M170 has a sharp-looking aerodynamic shape. And most importantly it doesn’t look like a budget device. The engraved pattern all around the sides prevents the mouse from losing grip due to sweating or moisture in the palms and fingers. This was such a relief since my older HP X500 was plain and frequent cleaning was required. Therefore in terms of look and feel, I would give it 4/5. Battery Backup When it comes to battery backup, just forgot about it! You get a complimentary ALCALINE AA battery pre-installed in the mouse. This battery is capable to work for the complete 12 months/complete year. In my 6 months of use, this seems like a reachable tenure. Close to 1 year and 3 months, the mouse started to lag and the culprit was the battery. So, when you feel the mouse is being slow to respond it’s probably the battery. AA batteries are readily available and are quite cheap. So I don’t think it can be an issue while maintaining Logitech M170. Thus, in terms of battery backup and availability, I would give it 5/5. Size Logitech M170 dimensions; width 61.5 mm, height 97.7 mm, and depth 35.2 mm. So it is a compact wireless optical mouse. A compact wireless mouse brings a lot of features to the table. To begin with, they are lightweight. And their Bluetooth nature makes them usable even when they are away from the laptop or computer. Let’s say you are stretched out and chilling on a couch while the pc monitor is a little far away. They are also useful when you are outdoors and you don’t have much space to keep a big mouse like on a train or a flight. Since they are small in size they are quite “handy” and are best companions while traveling friendly. Logitech M170 How It is To Use? While doing day-to-day activities like surfing websites, going through Facebook posts, Twitter feeds, and even Instagram, this optical mouse is very smooth and fast. The speed of the mouse (DPI) is different from the sensitivity you have set on your macOS or Windows. With the DPI of 1000 and pointer speed set to performance then you can see some impressive results. The left and right button clicks are not very loud. Definitely much more silent than HP X500. The clicky noise is not going to bother you that much. Mouse clicks are very precise and you will not miss a click. The same can be said for the scroll wheel. It is very smooth and provides scrolling line by line which is quite helpful while reading articles or text documents. Unlike some budget wireless mice that make noise while scrolling web pages or documents. This Logitech M170 scroll wheel makes very little noise that can only be heard by putting your ear very close to it. Due to its small form factor and faster optical sensor at the back, the mouse feels responsive and no lags or hiccups can be felt. And one more thing regarding the optical sensor. This sensor uses an invisible optical laser unlike most of the mice that have a red beacon below. This actually makes a lot of difference when working at night! How To Use Logitech Wireless Optical Mouse? Connecting the Logitech M170 is a piece of cake. All you need is to insert the USB receiver into the USB 2.0 of your laptop/mac or computer. And turning the toggle “on” from the bottom of the mouse. It’s that simple. You don’t need to install any mouse drivers for it to work. So it saves you time for making a Google search like “Logitech M170 Driver”. On Windows 10 however, you might be asked to download the latest software. Otherwise, on other operating systems like macOS Big Sur, and Ubuntu 22.04 it works out of the box. If you don’t know you can use a Bluetooth mouse and keyboard on a computer that doesn’t have Bluetooth hardware at all! All you need is a Bluetooth USB receiver. But the catch here is that you’ll need to buy a wireless mouse and keyboard combo. The best one we are using in the office is the Dell WH32 combo! Logitech M170 For Gaming Any Good? It works well! It is not a gaming mouse though as it misses on the side buttons and RGB lighting and stuff. But it will not disappoint. Since it is a lightweight wireless mouse you can pan around quickly like in the pic above, I was playing COD 2 and the mouse response was good. The Logitech M170 DPI is 1000 which is decent, keeping in mind the price. If you wish to increase the DPI of a mouse you can do it using the Microsoft Mouse And Keyboard Center. Here is the list of supported mice with changeable DPI. As of my experience so far with the Logitech M170 optical mouse, I haven’t faced any issue in regards to mouse lag or anything. Should You Buy Logitech M170 Wireless Optical Mouse? Definitely, it is a good buy at this price. Why? Because it offers the best-built quality, battery backup, buttons feel, no red LED light below. Other than that, it is among the best lightweight mouse for any work. Due to its form factor, it doesn’t take up much space on the table. As per durability, I have dropped it on the ground dozens of times and everything seems to be working fine. While doing any work i.e. video editing, scrolling through Facebook, or reading text documents I haven’t witnessed a delay or lag in response. Even while gaming, this budget wireless mouse will get the job done. Though my gaming does disappoint that you can see in the video (coming up soon)! Isn’t it too good to be true? well yes, it is! In my Logitech M170 review after 6 months of use, the only thing that restricts my experience is the size. For large hands, i.e. if you are comfortable using a 6-inch phone with one hand then going with Logitech M190 is a better choice. Otherwise, there is no deal-breaker issue or concern. So yes, you can say it is a good wireless optical mouse for under ₹1000. Very confidently, I can recommend you try out this wireless optical mouse for work from home! Wrapping Up! That’s it for our Logitech M170 review. I hope you would have found our few cents helpful! Do you have any queries? Please reach out at PadhKeDekho’s Twitter, Facebook, and Instagram. We would love to help! If you have decided to buy this wireless mouse then please use the below Amazon link. It will help us in keeping the website up and running and in that way, you will be helping out genuine content creators at no cost to you! Thanks for taking out the time in reading our Logitech M170 review! Please press the red bell icon on the left as we would love to have you around! Articles That Might Interest You! Just like the above article, we share our 2 cents in the form of reviews, tips & tricks, comparisons, and opinions so do check out those articles. And if you liked the content do share it with your friends and family! Thanks, we will see you at the next one!
Portronics Bubble Wireless Keyboard Review FAQ
Wireless Keyboard That Can Connect to 2 Devices?
Portornics Bubble is a great option under 1000 Rs that can pair to 3 devices. We’ve been testing it for over a month now and here’s the detailed review. Tap now to learn more.
Portronics Bubble Keyboard Review?
Portronics Bubble is a great option under 1000 Rs that can pair to 3 devices. We’ve been testing it for over a month now and here’s the detailed review. Tap now to learn more.
Are Portronics Product Good?
Yes, we’ve tested more than 5 products so far and all did what they marketed as —value for money and feature-packed.


