Cuzor 12V Mini WIFI UPS Review
PC Tech - Reviews

Cuzor 12V Mini UPS Review With 5 Pros & 2 Cons + Alternatives!

It’s been more than a year with Cuzor 12V Mini WIFI UPS and we are impressed with it. Finally, our struggle to find a good one is over! Here’s Cuzor 12V Mini UPS review after year of use!

Well, why do you need a WIFI UPS? Imagine, you are in an online meeting and the manager calls your name and before you could say Hi! A power cut happens and you get disconnected from the meeting!

Trust me, we have also experienced that watery feeling in the stomach!

It is very frustrating because switching to a mobile hotspot takes time. Moreover, if you are on a computer without a UPS power supply then you, my friend are out of luck.

So to overcome this, WIFI UPS is all you need!

This Cuzor 12V mini UPS review has everything you need to know before pressing the buy button!

Cuzor 12V Mini WIFI UPS Review

But first, let’s look at some features and our observations.

Features

Value

Input/Output

12V 

Peak Current

2A

Power Backup Claimed

3-5 Hours

*Battery Backup (Tested)

4 Hours

Built Quality

Size & Portabllity

Zero Lag Switching

Yes

Thermal Protection

Yes

Replaceable Battery From Brand Service

Yes

PadhKeDekho Rating

Check Best Price

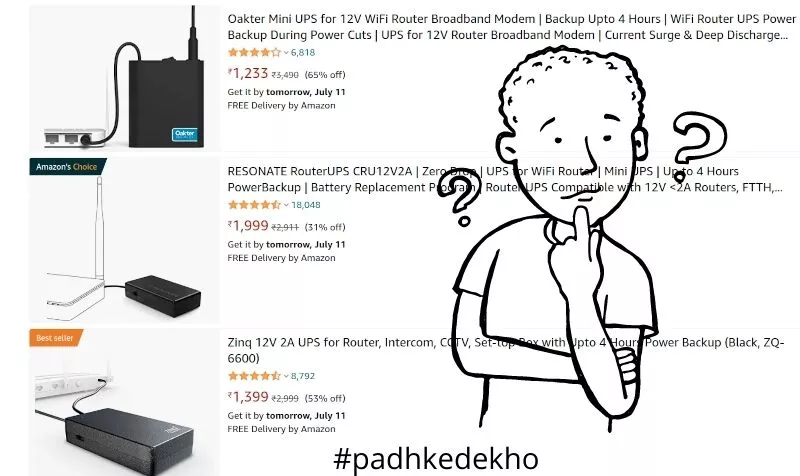
You can also check out our recommendations too.

Product Brand

Model

Battery Backup

Best Links

V-Guard 

Envibe 12D4

Up to 5 Hours

ZinQ

12V 2A

Up to 4 Hours

Resonate

CRU12V2A

Up to 4 Hours

At Padhkedekho, we provide customer-centric reviews and comparisons of products after using them for a month. Just to give you an honest review that will help in your decision-making.

As support to us, you will find Amazon links that will help us earn some commission if you place an order. We assure you will not be charged a penny extra! Thanks for your support so far.

Angaddeep SIngh

So without anything else, let’s start the review

Cuzor 12V Mini UPS Pros And Cons

Pros

  • Compact Design; Easily Fits Behind Router
  • No Disturbing Beeps When in Use
  • Works Fine With Airtel Fiber & Jio Fiber Router + Many Others
  • Up to 4 Hours of Claimed Backup
  • Zero Lag Switching; Wifi Never Powers Out
  • 1-Year Replacement Warranty

Cons

  • Slightly Expensive; But Worth it

What’s The Need For Wifi UPS?

Cuzor 12V Mini WIFI UPS Customer Review

Why do you need WIFI UPS when you can pair your wifi router directly to the computer UPS?

Well, yes you can do that. But the PC UPS does not provide longer battery backup. The one we have hardly run for 20-odd minutes!

What if I get a regular UPS and only connect the WIFI router to it? Well, we also thought about that. Even if the UPS has 600, 900, or 1000 watts it will not be enough! Let me explain.

The computer UPS powers heavy or powerful equipment like the CPU, monitor, printer, etc.

Since the WIFI routers generally need lower power like 9 or 12 watts, UPC treats such low watts as negative charges and stops the power supply within minutes.

That’s why the need for WIFI routers rose! So now you know the need for wifi UPS.

How to Use Wifi UPS?

Cuzor 12V2 Contents
Cuzor 12V2 Contents

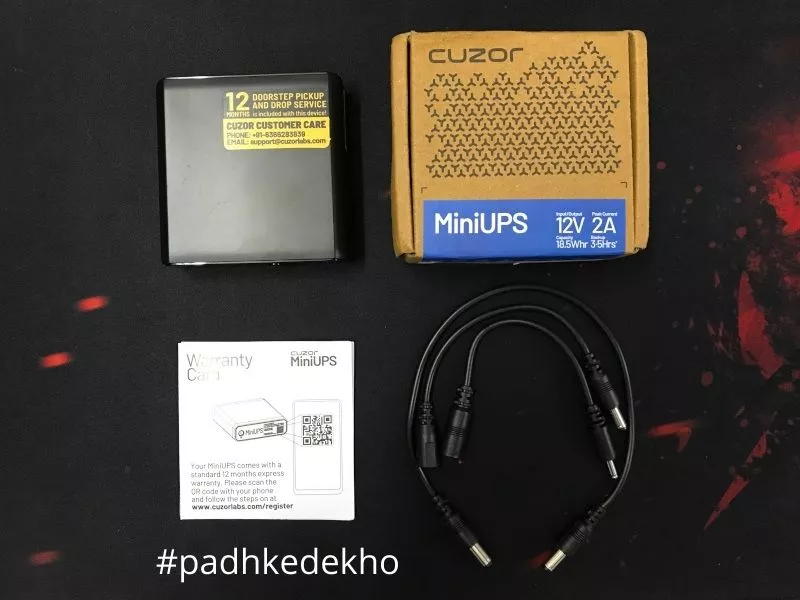
WIFI UPS doesn’t come with a charger which might be confusing as to how to provide power to the UPS. Well, it’s quite easy.

Your wifi router (be it from any brand) takes power from the wall socket using the standard power cord which looks like the old-school video game adapters (man good old 1990 – the 2000s).

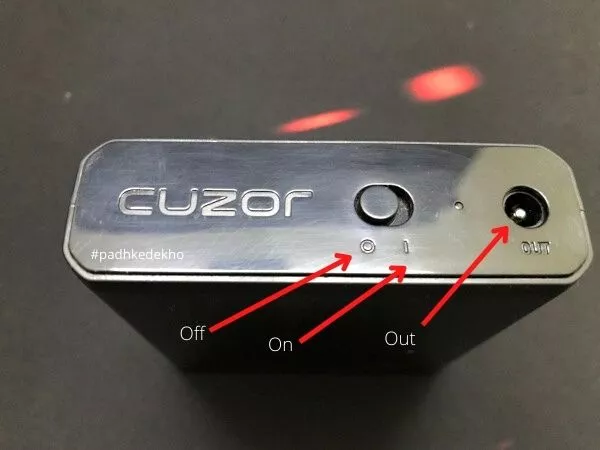
Take that power cable of your WIFI router and plug it into the “In” port on the Cuzor 12v UPS. Congrats! You are 30% through!

For the next step, pick the cable that looks like the old-school video game charger from the supplied cables, insert it from the “out” port, and insert it into the WIFI router. That’s 90 percent completion. The only thing left is to turn the toggle from off to on.

Cuzor 12V Mini WIFI UPS Customer Review

You will see a Green color light. This means the router is working from the main power supply and the WIFI UPS is getting charged. If a power cut happens, the light will turn red, and WIFI UPS will be activated. The moment power is back it will turn green.

If the WIFI UPS is on and you decide to call it a day and turn on WIFI. The UPS will behave like the power is gone. So do remember to google the UPS off otherwise it will stay on and the battery will get drained.

What You Should Know Before Ordering a WIFI UPS?

How to choose WIFI UPS

You don’t need to buy an additional power plug or charger just for that. Wifi UPS will utilize the power adapter of your current Wifi router like Airtel or Jio, etc.

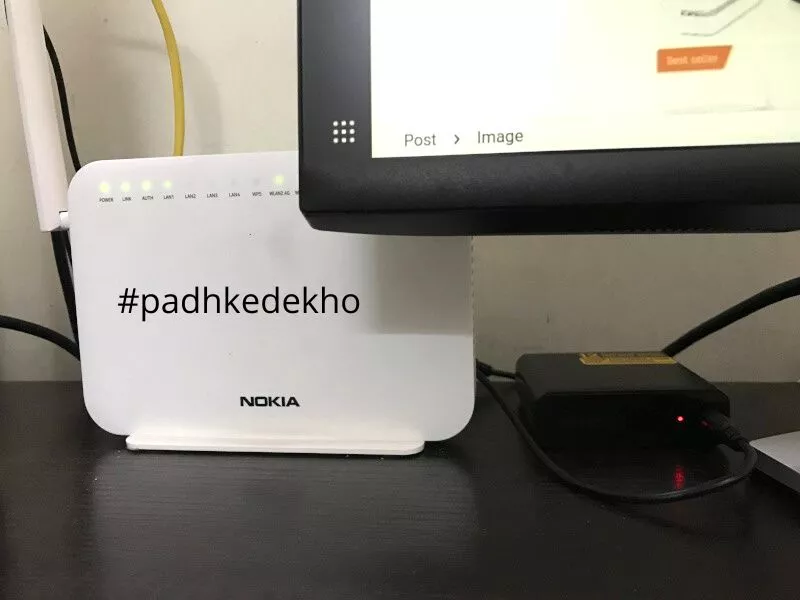
Another thing you should know is the current wattage and amp reading on your router. It’s generally written on the back of the router. E.g. below is a Nokia wifi router that comes with Airtel Fibre Internet so you can see their wattage and amp requirement.

is Nokia Wifi Router Compatible With Cuzor 12v Mini WIFI UPS

Based on these numbers, you can pick any Wifi UPS that supports that power requirement. The cables provided with the Wifi UPS are made per the brand’s needs.

So you don’t need to use other/non-proprietary ones. So these are the things that you should know before buying any Wifi UPS.

Why Should You Buy Cuzor 12V Mini WIFI UPS?

#1 Zero Lag Switching: How long does your wifi router take to boot up? Our’s take a good 30 to 50 seconds. Which is a long duration to break any meeting. Would you risk that? Not! Because that’s the reason you are investing money in a WIFI UPS!

So we’ve been using it for over a year and can confirm it’s truly lossless. As the direct power supply cuts, the UPS kicks like that and no internet is disconnected. Hence it’s a great feature.

#2 Wide Range of Devices Supported: This WIFI UPS supports all the routers that use 12 watts under 2 AMPS. Just make sure your wifi router falls under the category. In layman’s terms, all the default ISP routers work with this model. Be it Nokia from Airtel or Jio broadband all work fine.

#3 Battery Replacement Scheme for 599 Rs: If you intend to use this WIFI UPS for many years, it’s a great feature. Since it’s essentially a battery, it will degrade with time so you should keep in mind the availability of the battery for the wifi UPS you buy.

After checking around 7+ products we went with this because of how confidently the brand has explained the battery replacement scheme. By paying 599 Rs, they will pick it up from your place, get the battery swapped, and back to you. So I don’t think of any harm in trying this brand.

#4 Compact & Lightweight: If you look at the pictures above, the UPS is hardy a size of 5000 mAh power bank. Which makes it very compact. Many WIFI UPS are big hence people keep the WIFI UPS on top of the router. The story is the same if you intend to provide backup to the CCTV system of your shop or home. Well not anymore with Cuzor 12V Mini WIFI UPS! It’s been designed to consume less space.

#5 1-Year Door Step Pickup And Drop: If anything goes wrong, you can raise your concern, have a word with the service advisor and if the device needs service they will pick it up and drop it back after resolving the issue. It’s a breeze as you don’t have to go out and find the service center and try to explain things there.

Why You Should Not Buy Cuzor 12V Mini WIFI UPS?

This is a pretty good WIFI UPS which is almost perfect it’s just 2 things that can be a deal-breaker for many.

#1 If your wifi router consumes more amp power than 2 amps then you should avoid this particular model. Going with one stage above will be the correct choice.

#2 That’s the price. Decent Wifi UPS starts around 1400 once like the ZenQ 12V and this one is slightly close to 1800 Rs.

How Many Hours Will Cuzor 12v Mini UPS Works?

How Long Cuzor 12v Work

In this Cuzor 12V Mini UPS Review after a year of use, we have tested many cenarios. In one we watched a movie that consumes a lot of data and stresses out a wifi router.

The next time we use it for work like using Google Docs, writing blogs on WordPress light stuff like that. So to get an exact number with our Nokia G-2425G-A.

The company claims battery backup figures between 3 to 5 hours and we are happy to report that these are fairly close figures. In our testing, we got above the 3 to 4 hours.

With WordPress and juggling with emails and Google Docs, it crossed the 4-hour mark. So you will be fine for up to 4 hours. This means you don’t need to be worried about your next online meeting!

if you need more backup, you can check out the Cuzor Mini UPS Pro it can power up for 7 Hours!

Let’s say you don’t do many video calls or meetings per se but have surveillance cameras or CCTVs that record 24-hour footage.

This WIFI UPS will also help to keep you connected to the internet hence security footage will not go in vain. So for us, Cuzor 12V Mini UPS is great; a big thumbs up!

So Should You Buy This One or Go For Another One?

How is Cuzor 12v Mini WIFI UPS
Cuzor 12V Mini UPS Review

We went with this by skipping the Zinq 12V and Vguard Envibe 12D4. Though we have a good experience with VGuard for our office and home products we wanted to try something else.

Zinq is also good. One of our colleagues had it and unfortunately, by the time we could review he left us… So anyway we had a good time with that Wifi UPS and it was also good. We tested 3+ hours of battery backup.

We ordered and canceled the V-Guard 12D4 as we saw a few recent reviews where the customers received scratched products, nothing against VGuard, we talked to a few customers who got replacements too.

So if you are planning to grab V-Guard then rest assured their service is great.

But why Cuzor? Because their battery replacement scheme hit differently. Many WIFI UPS have non-replaceable batteries even if you take them to the service centers.

Then, there’s Cuzor who is openly claiming replacement after 2 years. And since we have it for a year-long and so far it’s been great!

Secondly, all the features mentioned above work brilliantly too. So you wouldn’t mind spending a little extra and getting something of good and premium design with a battery replacement waiting for you after two years.

Hence, keeping factors like built, battery backup, compatibility, in-box contents, and seamless registration process we are satisfied with it. It makes it a good buy for under 2000 Rupees.

Got questions? Don’t worry ping us on any social account below!

Are you willing to support local content? Please use the below Amazon button to place your order. Amazon will pay us some commission at no added cost to you. This encourages us to buy more products and keep the website running. Below are some of our other recommendations.

Product Brand

Model

Battery Backup

Best Links

V-Guard 

Envibe 12D4

Up to 5 Hours

ZinQ

12V 2A

Up to 4 Hours

Resonate

CRU12V2A

Up to 4 Hours

Wrapping up

That’s about it, folks! Hope you find this article helpful if you did then please share it with others and help them choose better. If you have any questions about any tech product then feel free to reach us at care@padhkedekho.com we will help you out the best way.

Suggested Articles!

  • Amkette Ergo View Laptop Stand Review! Justifies the Price?
    if you spend more than 3 hours looking down at your laptop screen every day then the odds of neck pain or Cervical Spondylosis are very high. Though it is not life-threatening it’s painful and hampers the work routine. Since work requires your time you can always check out some alternatives to make your life easier. One such product is a laptop stand. As the name implies, a laptop stand holds the laptop at a tilted angle at a height which ultimately helps you with your seating posture. Here’s a little demo that can help you understand the concept. A while ago we bought a budget STRIFF laptop stand (Review) that cost half the price! It’s been a good purchase but we were willing to buy a good quality laptop stand. And here’s Amkette Ergo View that we’ve been using for over 3 months and here’s our Amkette Ergo View Laptop stand review! Here we will tell you about the unboxing experience, built quality, looks, features, usability, and finally our verdict. Since we’ve used around 5 laptop stands, below are some recommendations as well. So with that said, welcome to PadhkeDekho. Here, we provide customer-centric reviews of tech products and accessories upon using them for at least a month. It gives readers like you insights that help in decision-making. Since we are supported by readers like you. Buying anything using the Amazon links on this page will help us earn a small commission at no additional cost to you. This however does not affect our feedback regarding a product. So let’s start the Amkette Ergo View laptop stand review with Pros and cons Box Contents/Unboxing Experience We’ve bought 5 laptop stands so far and all come with just the brand’s cardboard box. This raises a few concerns as sometimes the plastic on the laptop stands breaks. This happened with our STRIFF laptop stand that we mentioned in the review. We were quite skeptical until we got our unit and unboxed it. The plastic taping was untempered and the box felt fresh like a new box. Thanks to the bubble wrap the laptop stand was not broken or damaged. Our parcel came from Tamil Naidu (South India) to Dehradun (North India)! In the box, you get a laptop stand wrapped in bubble wrap and an angle adjustment guide. Bubble wrap was a nice touch. While many laptop stands come with a plastic wrapper. Good job there, Amkeete. So our unboxing experience was good. 5/5. Though we wished Amazon box could’ve been there. Built Quality (10/10) The overall build of the Amkette Ergo View laptop is plastic, which is a good one. There are no uneven edges or sharp corners that can discomfort you. Attention to detail is given around the corners, front, and bottom. The height adjuster is pure metal and feels strong when adjusted. It’s rigid and the laptop does not lose grip. As far as rubber grips go you get plenty of those; 4 on the surface where you will put the laptop, 2 near the trackpad, and 4 on the bottom where the laptop stand will rest. Note: Do remove the plastic wrapping otherwise your laptop can slip. So, are the rubber grips work or are they just for show? Well, they are solid. We’ve talked more about those in the user experience section below Hence for the built, the Amkette Ergo View laptop stand gets full marks; 10/10! Looks Unlike many laptop stands, that just come in one color; Amkeete Ergo View comes in two color options; Grey and the other one is Black. We bought it in Grey color since it adds dual color combinations as the height adjuster is Black. So how does it look? Well, it looks top-class for sure. From an angle, it speaks quality. The detail in everything is quite visible. Even the color remains the same even on the bottom where many laptops stand cut corners with a lighter color bottom. This color goes very well with Dark Grey, Black, and Silver laptops. Hence for looks, Amkeete has done a good job. I honestly do not like laptop stands where brand name stricks as the first thing. Though Amkeete has also given their logo it hides when you put the laptop on top. Therefore, for looks, the Amkeete Ergo View laptop stand gets an 8.5/10. Features 1: One Size Fits All! Thanks to the design, this Amkeete laptop stand can hold any laptop you have. Be it a 10-inch notebook, 13-inch Macbook, 14-inch Dell Vostro, or a full-size 15.6-inch laptop. This laptop stand will grip it like a baby and not let it fall. 2: Heat Dispersement: Amkeete has done something clever here. Instead of giving a full plastic base, they added big cutouts that help in heat dispersing. Sure it’s not like the cooling laptop stands that you buy for the same price, but it’s still better in context to not using a laptop stand. 3: 7 Level of Adjustments: That’s the point you will buy this laptop stand. It offers 7 height adjustments that come in handy when you have multiple tables or no tables at all to work on! The maximum and minimum angles are decently set using the metal adjuster on the back. 4: Non-Skid Design: Many laptop stands are good but lack good quality rubber skids. Not only on the surface below the laptop but also on the bottom of the laptop stand. Amkeete Agro View laptop stand had a total of 5 non-skid rubber stoppers below the laptop. 2 skid plates near the trackpad and 4 on the bottom. This ensures an amazing grip on wood/Plywood(non-glossy) tables and even glass tables. 5: No Scope of Sctraches: We’ve used a few metal laptop stands that leave scratches on the back, bottom, and around the trackpad area. That’s certainly you will not wish for your new laptop! That’s why we went with the Amkette laptop stand. The edges are smooth, the rubber grips quite well and the back panel has 5 rubber grips that work as raisers too. So the laptop surface does not get scratched. Hence for features, Amkeete Argo Laptop Stand gets a 9/10. User Experience It’s been over a month of daily testing on the Amkeete Ergo View laptop stand and so far it’s been worth the price. Let’s first talk about portability. the laptop stand is compact and can quickly be taken in a bag-pack along with your laptop. We have tested in three different bags and we faced no issues. The laptop stand has a 7-level adjustment. We measured the minimum height as well as the maximum height along with their angles so that you can have a better idea. The minimum height is 2.5 inches and it goes to 5.5 inches. Hence, you can choose the height and angle as per your comfort. While there are laptop stands that offer more height typing on these or using the trackpad becomes an issue. In those cases buying a separate keyboard and mouse will be essential. Since the Anti-skid rubber stoppers are raised and grip any surface quite easily, we did not have any issues with a big gaming mouse pad, Glass tables, Wood tables, and even bed tables which are generally plywood tables. So, you can trust the Amkeete laptop stand with your expensive laptop. The angle adjuster is metal which gives more confidence. It snugs in all the cutouts quite easily and stands firmly. We tried the lowest angle with a heavy Dell laptop and the laptop stand did not collapse or get stressed. Many budget laptop stands wobble when you type on them. Whereas on Amkette the wobble is quite less. if you are a hard hitter then you should use a keyword and a mouse. Even if you type softly, it’s better to buy an additional keyboard and mouse because there will be a tilt angle and it can cause some pain after prolonged hours of use. One more thing to talk about here is the heat dispersion. Since the elevation is quite good and then there are big cutouts on the laptop stand that help to cool down the laptop naturally. This will not only help to cool down your laptop but also help to improve your laptop overall life as heat is the biggest enemy of tech gadgets. So far our user experience is quite good. The only thing missing on the Amkette Argo laptop stand is the phone/tablet holder. Though it’s not a deal breaker it certainly helps to keep devices aligned and the table looks clean. So Should You Buy an Amkette Ergo View Laptop Stand? Alternatives? Amkette Ergo View laptop stand is a good option under 1000 Rs. If you are looking for a premium good quality product that offers soft edges and speaks quality then it’s worth it product. Unlike other laptop stands, it comes with a 1-year manufacturer warranty which can come in handy if something goes wrong. Thanks to the metal height adjuster, it takes the overall visual look and practicality to the next level. While adjusting the angle you will feel confident putting your expensive laptop on top of it. As for looks, the Egro View laptop stand comes in two color options. Which gives options. So is this the best laptop stand under 1000 Rs? Well, it’s certainly a worthy option under 1000 Rs. Though the price could’ve been better. Don’t get us wrong, the build is good, the metal adjuster inspires confidence, and the grip is quite good laptop stand does not lose grip. But this is also true that you can get an air-cooled laptop stand with LED lights/Fans for a similar price. if you prefer an air-cooled laptop stand or a laptop stand with a fan you can check out the Zinq Cool Slate Dual Fan Cooling Fan (Review soon). With everything in mind, the Amkette Ergo View laptop stand gets our approval as a good quality laptop stand that’s travel-friendly and inspires confidence. You can certainly check it out. BrandFeatureBest PriceSTRIFF Laptop Stand (Review)Laptop Stand + Phone/Tablet HolderAmazonAmkette Ergo ViewPremium Built (Metal Adjustment) + Good GripAmazonZinq Cool SlateLaptopStand With Fans/LEDsAmazonAmazon Basics Laptop StandAluminum BuiltAmazonThe best laptop stands under 1000 Rs in India 2023 Wrapping up! There you have it folks! This is PadhkeDekho’s Amkette Ergo View Laptop Stand Review after 1 month of testing. if you have any questions then please comment below or reach us on the social accounts. We love to help our readers with the best options. Did you like the content and feel like supporting local content? Then please use the Amazon button below to buy the Amkette Ergo View laptop stand. Rest assured you will not be charged a Ruppe extra. It helps us keep the website up and running and buying more products to review. Thanks for your support, we are 3 tears old now! Suggested Articles F.A.Q
  • Amkette Optimus XL Review | All Show or Useful Features?
    A full size wireless keyboard with 4 device support? Interested? Here’s Amkette Optimus XL Review after 1 month of testing. Tap now!
  • HP 250 vs Logitech M170 | Best Wireless Mouse For You?
    Under 1000 Rupees you can find many wireless mice from top brands like Dell, HP, Logitech, Lenovo, etc. But HP and Logitech are the most popular choices. For instance, on Flipkart, Logitech M170 has 4.5 ratings just like HP 250. This was also one of the reasons I bought the Logitech M-170, 1 year ago. After using it for such a long time I’ve also shared my 6 months review for it. Also, we bought HP 250 which is also a wireless mouse (Review). In this article, I am doing an HP 250 vs Logitech M170 comparison to tell you which is the better deal. Not only that but which one is ideal for what type of user? So without anything else, Welcome to PadhKeDekho, and let’s get started! Update: Both mice are available at a huge discount on Amazon’s sale. Click now and check out the deals! Hey There! Welcome to PadhkeDekho. Here we buy tech products and use them for at least a month before sharing the review of comparison. It gives readers like you insights that help you choose better. As we are supported by the readers. Buying anything using the Amazon links will help us earn a little commission at no additional cost to you. This motivates us to do what we have been doing for the last 3 years. Thanks for the support. HP 250 Vs Logitech M170 Differences Which One Has Better Built Quality? Both the mice are completely made up of plastic. But the quality of plastic is different. It is an HP 250 that has a better build. You will not find a single squeaking even when you press it very hard. This is the second mouse from HP that I’ve owned and also used dozens in my college days so it goes in their tradition! With any HP mouse, you can be less worried about its quality. It’s not like the Logitech 170 has a poor build. It’s just HP feels more solid in the hand. I’ve used the Logitech 170 for 6 months I never felt anything bad about the built quality. But switching to HP has shown the difference. Considering a price difference of a few hundred rupees, unmistakably go with HP 250 if the built quality is your topmost priority. Look and feel (Design) To be honest, in terms of design, Logitech M170 feels like a 20th-century mouse! Whereas, HP 250 seems like from the future! This futuristic look might have a love-it-or-hate-it kind of first impression. However, I loved the design of the HP 250. Logitech M170 has a textured finish all around the sides except the area where your palm will rest. This texture helps to enhance the grip of the thumb, palm, and pinky finger. But here’s a thing you should know. If you have a small or medium hand size then it will be very comfortable. But it might not work its magic on large hands since it is a compact form factor mouse. A regular mouse has an arc design however this one has a slanting curve. This slating curvature adds comfort while using it for an extended period of hours. Whereas, HP 250 has an inward design on both sides. This inward design and full-size form factor take comfort to the next level. Your thumb, palm, and pinky finger will have the best comfort. I am writing this after using the mouse for more than 12 hours continuously, so you can understand! Now let’s talk about comfort in detail. Daily, I work around 12 hours and I had no issues using any of them for such extreme working hours. So who would not like being more comfortable? Therefore, it’s the HP 250 that is better than the Logitech M170 in terms of sheer comfort.  Usability Both the mice have smooth and responsive buttons. Even the scroll wheel works well. So at this point, if you buy any of these you will not miss anything for basic tasks. But if you need to take care of advanced photo editing software like Photoshop or gaming then HP 250 is going to be the one for you. Due to size, the HP 250 forms the best grip. Secondly, it supports 3 changeable dpi that allow even better and more accurate responses.  As far as the button’s click goes, the buttons are much silent on Logitech M170. Why? Because of the small form factor, the buttons have less travel. Whereas HP 250 is a full-size mouse so the clicks are prominent but it will not disturb you. But if you are concerned about the click response then HP 250 is the clear winner. The clicks are instant. Certainly much faster than the Logitech M-170. Don’t get me wrong, Logitech is also fast but HP is way more swift. Now about the scroll wheel. It is much smoother on Logitech. But there’s also one thing you should know. Do you work on spreadsheets Google Docs or any Word-based document? If yes then HP should have your eyeballs! Though it’s not smooth but is very accurate. Let me explain! Let’s say you are working on a text document and your paragraph is 5 lines long. You need to reach line 5. So rotating the scroll wheel close to you will make it work easily. But on Logitech M170 the scroll wheel works fast so you will cross line 5 or reach line 4 then use the arrow keys to navigate. So in terms of usability, it is an HP 250 any day! But now there’s practicality! Practicality – Which Is Better On The Go? For the best on-the-go experience the mouse has to be tiny so it can be used on the train or flight table and also be lightweight when it’s in your backpack. Both the scenarios can be tick marked by Logitech M170. Being an SUV, the HP 250 next to Logitech needs space! If you are on the go most of the time then Logitech M170 is better. But if you have a computer setup or have space for it to spread out then do grab the HP 250. When I am on the go, I prefer using the trackpad of my laptop. So it doesn’t affect me that much. But it can be a deal maker or breaker for you. HP 250 Vs Logitech M170 Which One Is Best For You? If you are looking for a small form factor and lightweight mouse for your needs be it indoors or on the go then Logitech M170 is the choice for you. Additionally, you will experience quite silent clicks and a smooth scroll wheel. In terms of laser optics, you get an invisible laser instead of red or blue. This helps if you work at night. With HP 250, you get a bigger and more comfortable mouse. Secondly, there are 3 DPI to choose from and make your experience very smooth and fast. As far as the optic laser goes, on HP you get a blue laser instead of red or invisible. In terms of grading from low cost to expensive, it is a red laser that is found on cheap mice. Invisible at moderate prices and blue for the expensive range. Then you get a faster click response so you can use it for your benefit while playing fast-paced shooter or racing games. So with HP 250, you get so many special and practical upgrades for better and more efficient working. But in the end, it all depends on what you are looking for is it a compact form factor or changeable dpi and maximum comfort? For me though, it is HP 250 which checkmarks all the boxes. But I will end with this. Logitech M170 and HP 250 are great wireless mouse choices below 1000 Rupees. Buying any of them and aiming to last a few years is not a difficult task. So all in all, that’s for sure both are great deals for the bucks you will be spending. Wrapping up Hey there, if we were of any help in your decision making then please use the below best buy links of Amazon and Flipkart. This not only motivates us to bring articles like this but also helps us to keep the website up and running at no cost to you! This is it, guys! That’s our few cents on the HP 250 vs Logitech M170 comparison. If you found this helpful then do share it with friends and family so that they should also choose better! Do you have doubts or have suggestions? Then do reach us at PadhKeDekho’s Twitter, Facebook, and Instagram, or comment below. We will get back to you as soon as possible! Just like the above article, we share our 2 cents in the form of reviews, tips & tricks, comparisons, and opinions so do check out those articles. And if you liked the content do share it with your friends and family! Thanks, we will see you at the next one! Suggested Articles!
  • TP Link AC750 Review [TP Link RE200 Review] | Worth it?
    Do you have dead WiFi zones at your home or office? TP-Link AC750 or TP-Link RE200 is a good choice. We bought it a month ago, used it thoroughly and this TP Link AC750 Review will help you decide whether to buy this or the slightly cheeper 2.4 GHz model. What is this for? It is a range extender device that helps improve Wi-Fi strength in homes, offices, and shops where a Wi-Fi connection is weak or non-existent. The biggest advantage it brings is convenience and saving extra money spent on your mobile data. We’ve been using the 2.4 GHz TP-Link range 850RE (Review) for over 4 months. It has been great and serves its purpose. We upgraded to AC750 due to dual-band Wi-Fi compatibility on RE200. So, it’s a useful product. Do you need one? Read the review and make the choice. Welcome to PadhkeDekho, where we buy tech products and use at least a month before sharing a detailed review or comparison. This gives readers like you insights that help you choose a better product. As we don’t do sponsored content whatever you read or watch on our YouTube channel is true from the heart of a customer to a customer. As a support to us, we earn from qualified sales via the Amazon links on the blog. Be assured, you will not be charged a penny extra. Thanks for your continuous love, PadhkeDekho is 4 years old now! With that said, let’s begin the TP-Link AC750 review with the pros and cons. TP-Link AC750 Pros & Cons Pros Cons Good built quality Requires 3-pin plug socket Compact yet stylish design Smaller vertical lights Compatible 802.11 b/g/n & 11ac WI-Fi devices Easy setup process 3 years warranty Supports 2.4 & 5 GHz bands Covarge for about 2000 sq. ft. area (tested) Box Contents The TP-Link AC750 or TP-Link RE200 has very minimalistic packaging. Inside, you will see a cardboard box to hold the device intact and a detailed English setup guide. Please note that there was no seal or taping on the case. We put it here because many people ask us about the seal and originality of a product. With that said, the device we got is original. Built Quality (9/10) We have tested a few budget range extenders under 2000 Rs, and TP-Link impresses quite a lot. If we have to put it in one word, it is great. Even though the device has a plastic body, the panel is quite strong and has no sharp edges. Moreover, it is firm and soft and does not harm the hand when operating. The back holds a 3-pin connector with thick legs that fit into any regular Indian wall socket. Another point to note here is that it does not heat up. The daily temperature in Dehradun (at the time of testing) was about 35 degrees C and no ventilation was provided. Even after 4 hours of use, it will slightly warn that you can keep it on your palm. Note: Since we did the extreme testing we don’t suggest you do the same. At least keep the ceiling fan on! Therefore, in terms of built quality, TP-Link never disappoints and this device is no different. Hence 9/10 for built. TP-Link AC750 RE200 Looks (9/10) Unlike the 2.4 GHz model, this is on the next level. You can see and feel the texture on the front. Secondly, the light’s orientation is changed to vertical lines and smaller, which does not make it highlighted in dark lighting. The overall design is compact and lightweight making it similar to a mosquito-repellent machine! The lights switch between red and green combination and the power button always stays green. We liked the simple yet elegant design with just a small branding on the front. So for looks and design, the TP Link AC750 is perfect and looks good even in the drawing room. Hence, 9/10 TP-Link Wifi Range Extender Setup (Very Easy Setup) The setup process is very streamlined keeping in mind the first-time user. There are 3 methods of initiating the process. The first approach is via the WPS button if your router has it. The second is via the TP Links Teather app which we recommend. The third one is via the web browser. Before starting any method, plug the range extender close to the Wi-FI router. You will need to create on TP-Link account and then select the type of device you have. After that, it will ask you to connect with your WI-FI. This is the beauty of this range extender as it supports both bands you will see both in the settings. Enter your password and make EXT or extension to range for any particular frequency or both if you want. You can create a new password if you want. We choose to keep it the same for convenience. Once everything is done, move the range extension to the weak WI-FI zone. Just make sure the extension is receiving signals from your WI-FI router. It will be reflected on the extender with red and green lights. if it’s red near 2.4 and 5 GHz bands, move the extender a little closer to the WI-FI router. Once all the lights come up on the range extension (it takes about a minute) check your phone and make sure it’s connected to the EXT or extension of the desired network you wish to connect and enjoy better speed and coverage. TP Link AC750 Speedtest We had two major concerns with the TP-Link Wi-Fi Range Extender 5 GHz; range and speed. We didn’t care much about the 2.4 GHz band, as 5 GHz was getting all the attention. So, what kind of upload/ download speed and coverage have we got? Well, let’s first talk about the range of wifi coverage. Our present Airtel router is on the first floor and we barely get any coverage on the ground floor. As per the paper specs, this extender can work up to 200 sq. yd. We bought this range extender to remove the dead wifi zone on the ground floor. After successful installation, we report that TP-Link AC750 or TP-Link RE200 has provided about 95% coverage of the 5 GHz band. Here’s the link to the detailed review video. Since we barely had any WiFi range on the ground floor, here’s the speed test next to the Wi-Fi router on the first floor followed by a speed test just below it on the ground floor, next to the far spot on the bottom floor. Also, notice the WIFI bars to see the coverage. We got 45.4 and 47.1 as download and upload speeds next to the router ( which is the benchmark). Slightly better download speed on the ground floor while upload takes a dip. The 37.8 and 30.7 speeds when we moved a little far on the ground floor. The 23.7 and 18.0 speeds are from a spot that is almost our home. Note: All these tests were conducted while a few devices were connected and using the internet. So to sum up the download, upload speed, and coverage, we are quite satisfied with all the results. Features #1 Mesh Wifi Range Extender: Mesh network technology is a straightforward yet complex type of networking that creates nodes (devices) and those nodes create or expand the network. Whereas, regular range extenders replicate the signals coming out of the router. What does it mean to you? In simple language, TP-Link RE200 or AC750 with its Mesh network makes sure you are connected via the strongest network automatically. With the regular range extenders, you would manually change depending upon the network availability. #2 Compact & Plug and Play Design: The overall structure is compact with a flat design making it slimmer than a Good Night machine (mosquito repellent machine). It’s very lightweight. Since there are no wires it feels neat and not a bulky piece of tech on the switchboard. #3 Smart Signal Detector: The range extender is smart; it shows the strength as “too far from the router” and “strong connection” via the red and green lights. It gives you more control and an overall view of the router and range extender connection status. #4 Dual Band Mode: RE 200 or TP-Link AC750 supports Dual Bands like 2.4 GHz and 5 GHz. 2.4 GHz is widely popular more than 90% of devices run on it. On the other hand, 5 GHz is newer. Which one should you use? If you are close to the WIFI reception then 2.4 GHz will be better because of a stable connection. 5 GHz has better upload/ download speeds & a wider network range. #5: Pro Mode: You can create network profiles connect many nodes (devices), and manage them to become a network manager! Also, you can allow or disallow devices to have network access. In other words, TP-Link AC750 gives you pro-level network control of the broadband connection. Are We Satisfied With The Purchase? Yes, we are quite satisfied and here are the reasons. First, the product comes with a 3-year warranty. On the same note, we have many TP-Link products and have never claimed their service. The second is wifi coverage. We have 3 floors to cover. The Wi-Fi router is on the first floor. Major work is done on the second floor and is taken care of with the LAN cables and the 2.4 GHz range extender that we talked about. This left the ground floor as Wifi dead zones. The TP-Link 2.4 GHz range extender works well on the second floor while this 5 GHz takes care of the ground floor as well as the porch and outside area. The total covered area of the ground floor including the outdoor/ porch is around 2000 sq. yd. Which seems to be perfect for this range extender. if you have a bigger place or multiple floors you can consider TP-Link AC750 or TP-Link RE200 model. Since the network coverage is good the upload and download speeds are quite close to the pack we have chosen. So to sum up, the TP-Link AC750 Wifi range extender is a great solution to kill your dead wifi zones at the office/home/ shop/ showroom. We are very satisfied with it. We are wrapping up! There you have it—the TP-Link AC750 review after one month of testing. If you have any questions, please reach out. We love to help! Related Product Reviews TP-Link AC750 FAQ Question 1: Are TP-Link AC 750 & RE 200 the same? A: Yes, TP-Link AC 750 and RE200 OR RE 200 are the same. Just different names. Question 2: TP-Link AC 750 warranty? With many TP-Link products including the AC750 or RE200, you will get 3 years or warranty from the date of purchase. Question 3: TP-Link AC 750 App Name? Answer: To set up and control the extender you will need to install the Teather app which is TP Link’s app. It’s free to download on Android and iOS. Question 4: TP Link AC750 Dual Band? Answer: Yes, TP-Link AC 750 or RE 200 supports 2.4 GHz and 5 GHz bands for a wider range and connectivity. Question 5: TP Link AC750 Battery? Answer: TP Link AC750 works with electricity no battery is needed. Question 6: TP Link AC750 Coverage? Answer: It’s easily about 2500 SQ Yaads and about 70% coverage on 2 floors. Question 7: What is your TP-Link AC750 extender review? Answer: We are quite satisfied with the speeds and overall coverage with TP-Link AC750 or TP-Link RE200. Here’s the detailed review! Question 8: TP-Link AC750 guide? Answer: This TP-Link AC750 review will be a great guide for you. If not, comment below or reach us we will help you sort your query.
  • Logitech M170 Review After 2 Years Use | Worth it?
    It’s been more than 2 years and the mouse is still going very strong. No sign of aging! The buttons are working fine. Back to review. The demand for computer peripherals has skyrocketed making them the top-selling products on most E-commerce platforms. Especially wireless mice and keyboards. Around 2 years ago, we bought Logitech M170 wireless optical mouse. So in this article, we are sharing the Logitech M170 review after 2 years of use! Update: Logitech M170 is at a heavy discount on Amazon’s Great Freedom Festival Sale. Click now to check the deal! My coverage of the Logitech M170 is going to help you learn about its built quality, battery backup, design, look and feel, size, user experience, gaming performance, and much more! So this article is going to be very important to you. Therefore, without wasting any more time of yours, welcome to PadhKeDekho, and let’s get started! Hey There! If you are new around please hit the red bell icon on the left to be notified of our new coverage. Because we keep on bringing articles like this, tips and tricks, unboxings, and reviews that will help you learn more about the products and make a better choice! Logitech M170 Wireless Optical Mouse Review Logitech M170 Specs Design Unlike regular mice that usually have a curvature in the design, the Logitech M170 wireless mouse offers a slanting curve. This gives it a modern look. I got used to it very quickly and going back to the Hp X500 feels bulky and boring. This is going to be subjective though. I loved the design, in fact, got a few compliments from my office colleagues as well! So it’s a win-win for me! If you have medium to small hands then this is going to be very comfortable even for a complete 8 hours shift or extended office hours. But like me, if you got large hands then you can go with Logitech M190. If I would have known this before buying then could have bought Logitech M190! By large hands, I mean a person who can use a 5.5 to 6-inch screen phone single-handedly. Due to my big hands, I found it a little less comfortable than my HP X500. So if you also have large hands then either go with the above suggestion or compromise a little. Thus in design, I will give it 3/5. Built Quality The built quality of Logitech M170 hard plastic is strong. The buttons are equally good and the same can be said for the scroll wheel. When I was ordering it there were a few reviews saying bad about the scroll wheel. Since I have been using it for 6 months now, the authenticity of the reviews is questionable. M170 has taken a few falls on the ground and ruff and tuff handling as well. Even then, the scroll bar and buttons show no sign of issues. If you avoid eating on your computer table, then I don’t think it will ever go bad that easily. You can feel the weight on the palm side where your hand will be resting. Unlike HP X500 where the weight is all in the center. While we are at it, the weight of the Logitech M170 is 70.5 Grams with a battery making it lightweight and compact making it ideal for work from home. I am more than satisfied with its built quality. There is no squeaking or noise while trying to press the body of the mouse. So I would give it 4.5/5 in terms of built quality. Look And Feel In terms of looks, on the first glance, it doesn’t appear like a regular mouse. Due to the slanting slope, Logitech M170 has a sharp-looking aerodynamic shape. And most importantly it doesn’t look like a budget device. The engraved pattern all around the sides prevents the mouse from losing grip due to sweating or moisture in the palms and fingers. This was such a relief since my older HP X500 was plain and frequent cleaning was required. Therefore in terms of look and feel, I would give it 4/5. Battery Backup When it comes to battery backup, just forgot about it! You get a complimentary ALCALINE AA battery pre-installed in the mouse. This battery is capable to work for the complete 12 months/complete year. In my 6 months of use, this seems like a reachable tenure. Close to 1 year and 3 months, the mouse started to lag and the culprit was the battery. So, when you feel the mouse is being slow to respond it’s probably the battery. AA batteries are readily available and are quite cheap. So I don’t think it can be an issue while maintaining Logitech M170. Thus, in terms of battery backup and availability, I would give it 5/5. Size Logitech M170 dimensions; width 61.5 mm, height 97.7 mm, and depth 35.2 mm. So it is a compact wireless optical mouse. A compact wireless mouse brings a lot of features to the table. To begin with, they are lightweight.  And their Bluetooth nature makes them usable even when they are away from the laptop or computer. Let’s say you are stretched out and chilling on a couch while the pc monitor is a little far away. They are also useful when you are outdoors and you don’t have much space to keep a big mouse like on a train or a flight. Since they are small in size they are quite “handy” and are best companions while traveling friendly. Logitech M170 How It is To Use? While doing day-to-day activities like surfing websites, going through Facebook posts, Twitter feeds, and even Instagram, this optical mouse is very smooth and fast. The speed of the mouse (DPI) is different from the sensitivity you have set on your macOS or Windows. With the DPI of 1000 and pointer speed set to performance then you can see some impressive results. The left and right button clicks are not very loud. Definitely much more silent than HP X500. The clicky noise is not going to bother you that much. Mouse clicks are very precise and you will not miss a click. The same can be said for the scroll wheel. It is very smooth and provides scrolling line by line which is quite helpful while reading articles or text documents. Unlike some budget wireless mice that make noise while scrolling web pages or documents. This Logitech M170 scroll wheel makes very little noise that can only be heard by putting your ear very close to it. Due to its small form factor and faster optical sensor at the back, the mouse feels responsive and no lags or hiccups can be felt. And one more thing regarding the optical sensor. This sensor uses an invisible optical laser unlike most of the mice that have a red beacon below. This actually makes a lot of difference when working at night! How To Use Logitech Wireless Optical Mouse? Connecting the Logitech M170 is a piece of cake. All you need is to insert the USB receiver into the USB 2.0 of your laptop/mac or computer. And turning the toggle “on” from the bottom of the mouse. It’s that simple. You don’t need to install any mouse drivers for it to work. So it saves you time for making a Google search like “Logitech M170 Driver”. On Windows 10 however, you might be asked to download the latest software. Otherwise, on other operating systems like macOS Big Sur, and Ubuntu 22.04 it works out of the box. If you don’t know you can use a Bluetooth mouse and keyboard on a computer that doesn’t have Bluetooth hardware at all! All you need is a Bluetooth USB receiver. But the catch here is that you’ll need to buy a wireless mouse and keyboard combo. The best one we are using in the office is the Dell WH32 combo! Logitech M170 For Gaming Any Good? It works well! It is not a gaming mouse though as it misses on the side buttons and RGB lighting and stuff. But it will not disappoint. Since it is a lightweight wireless mouse you can pan around quickly like in the pic above, I was playing COD 2 and the mouse response was good. The Logitech M170 DPI is 1000 which is decent, keeping in mind the price. If you wish to increase the DPI of a mouse you can do it using the Microsoft Mouse And Keyboard Center. Here is the list of supported mice with changeable DPI. As of my experience so far with the Logitech M170 optical mouse, I haven’t faced any issue in regards to mouse lag or anything. Should You Buy Logitech M170 Wireless Optical Mouse? Definitely, it is a good buy at this price. Why? Because it offers the best-built quality, battery backup, buttons feel, no red LED light below. Other than that, it is among the best lightweight mouse for any work. Due to its form factor, it doesn’t take up much space on the table. As per durability, I have dropped it on the ground dozens of times and everything seems to be working fine. While doing any work i.e. video editing, scrolling through Facebook, or reading text documents I haven’t witnessed a delay or lag in response. Even while gaming, this budget wireless mouse will get the job done. Though my gaming does disappoint that you can see in the video (coming up soon)! Isn’t it too good to be true? well yes, it is! In my Logitech M170 review after 6 months of use, the only thing that restricts my experience is the size. For large hands, i.e. if you are comfortable using a 6-inch phone with one hand then going with Logitech M190 is a better choice. Otherwise, there is no deal-breaker issue or concern. So yes, you can say it is a good wireless optical mouse for under ₹1000. Very confidently, I can recommend you try out this wireless optical mouse for work from home! Wrapping Up! That’s it for our Logitech M170 review. I hope you would have found our few cents helpful! Do you have any queries? Please reach out at PadhKeDekho’s Twitter, Facebook, and Instagram. We would love to help! If you have decided to buy this wireless mouse then please use the below Amazon link. It will help us in keeping the website up and running and in that way, you will be helping out genuine content creators at no cost to you! Thanks for taking out the time in reading our Logitech M170 review! Please press the red bell icon on the left as we would love to have you around! Articles That Might Interest You! Just like the above article, we share our 2 cents in the form of reviews, tips & tricks, comparisons, and opinions so do check out those articles. And if you liked the content do share it with your friends and family! Thanks, we will see you at the next one!
  • TP-Link UB500 Review | TP-Link Bluetooth 5.0 Range + Others?
    In this TP-Link UB500 review, we shared our opinions after using the product for a month. if you are considering this Nano Bluetooth receiver then this article is for you. It’s been over 6 months of daily using this Bluetooth receiver. So far it has shown no issues whatsoever. We tested it with Windows 11, Windows 10, Windows 8, Windows 7, Ubuntu 18.04, Ubuntu 20.04, 22.04, and even 24.04. It gets our approval. How to connect wireless headphones to a PC without Bluetooth? Can I Pair BoAt Airdopes With a laptop without Bluetooth? How do these Nano Bluetooth dongles work? We get these types of questions a lot on Instagram! These dongles have bombarded online as well as offline stores. They are available from 300 Rs and go above 2000 Rupees. So to answer these questions, yes, these USB dongles can let you connect your non-Bluetooth computer to your Wireless TWS. The one we have shared is value for money and it’s just plug-and-play. Moreover, it’s fully compatible with Windows, Mac, and even Linux (Ubuntu). This USB dongle is from TP-Link and costs just around 600 Rs. So how good or bad is it? Should you buy one? Here’s PadhkeDekho’s TP-Link UB500 Review after 1 month of use. In this TP-Link UB500 review, you will find the Pros & Cons, Specifications, Features, How-to connect, and finally our verdict. if you have any issues or queries about this product, feel free to ping us on the below social accounts. We love to help our readers as much as we can! At PadhkeDekho, we buy tech products and use them for more than a month before publishing our reviews and comparisons. This gives our readers added value instead of the marketing points you will get from the others! We use a product just as a customer would do hence, you can trust the opinions shared by our editorial team. As a support to us, you can shop using the below Amazon links. We might earn a small commission at no additional cost to you. That being said, let’s begin the TP-Link Bluetooth 5.0 receiver review with Pros and Cons. Specifications Feature Value Model UB500 Inbox Contents USB Adapter & Quick Installation Guide Compatibility Windows, Mac, Linux (Tested) Can be Used With Wireless Keyboard & Mouse? Yes, if Your Peripheral Supports Bluetooth Connection (not just wireless) Bluetooth Version 5.0 Best Buy Link Amazon In-Box Contents TP-Link UB500 Review – Features of TP-Link UB500? #1 Portability: Since it’s a tiny USB solution for Bluetooth you can put it on any laptop or computer and can connect your favorite audio gear with it without worrying about wires or opening the CPU casing to access the modem. #2 365 Days Warranty: A few years ago we bought the TP-Link USB Wi-Fi adapter for our PC and it’s working well (review)! Just like that, this Nano USB Bluetooth adapter comes with a 1-year warranty. So you’ll have peace of mind! #3 Support For All Major Operating Systems: We’ve few computers and for productivity, we use Ubuntu and supported hardware for it is not easy to find. Hardware brands talk a lot about macOS and Windows but Linux or Ubuntu is not given much thought. So after testing on many devices, This TP-Link UB500 Bluetooth 5.0 receiver works well with Ubuntu (18.04, 20.04, 24.04), and Windows (7, 8, 8.1, 10, and 11). For Windows, you get a CD in the box with the drivers or download it from the TP-Link website. #4 Bluetooth 5.0: The cheaper variant of TP-Link supports up to 4.0. Bluetooth version. Whereas, this one is the latest and offers better signal strength and better support with newer Bluetooth devices. Since we tested a lot of Bluetooth 5.1 or 5.2 devices we did not find any latency issues as such. #5 Faster Speed: We’ve tested a few other USB Bluetooth dongles and they had two bad things; continuous blue blinking and slow bootup. You get non-on TP-Link UB500. So for the price of 600 Rs, TP-Link UB500 is a worthy purchase. But the question is; how will you connect your headphones to a computer without Bluetooth? Coming up next! How to Connect PC With Bluetooth Using TP-Link? if your computer does not offer a Bluetooth connection then you have 2 options to get Bluetooth working on it. First, you can buy a Bluetooth modem from Amazon or a computer hardware shop around you. For that, you would need to know your computer’s motherboard type and hunt for compatible Bluetooth modems in the market. if you are tech-savvy and know how to build a computer yourself then it would be a walk in the park. Otherwise, It’s a total nightmare of wasting money. Or, the second and most practical choice is to buy a USB dongle from TP-Link. All you need is to plug in the USB dongle in any vacant USB 2.0s slot of your computer and you are done. You will see Bluetooth next to Wifi settings. If you have Windows, you will need to install the drivers from the CD provided. For Mac and Ubuntu (Linux) you do not need to install any driver the plug-and-play works excellently. I’ve tested TP-Link UB500 on Ubuntu 20.04 LTS, Windows 7, 8,8.1,10 & 11. So you have pretty much covered with the TP-LINK Bluetooth 5.0 Nano USB solution. Should You Buy TP-Link UB500? We get that. There are many Bluetooth dongles available for 300 Rs online. Why would you spend 600 Rs? Well, We’ve tested those and they do not work. Some do, but the Bluetooth range is very bad. TP-Link is a trustworthy brand and the product has worked flawlessly in our month of testing on multiple devices. You can read the features if you have jumped to the verdict! You can buy the TP-Link 4.0 but will have connectivity issues or even latency issues with the newer Bluetooth version. Moreover, the 5.0 model offers backward compatibility where you can connect the old headphones with Bluetooth 4 or even lower. In our one-month review, we did not face any compatibility or not responding errors. Even the range was fine just like our smartphone. While testing the 300 to 500 Rs ones, we found the blinking of the Blue light distracting when the device formed the connection. Whereas, on TP-LInk there is no Blue light which means you can use this at night without any blinking LED. So should you buy a TP-Link Bluetooth 5.0 USB dongle? Well, yes you can confidently pick one. It’s a durable product and counts less than 1 Cheese burst medium pizza! Suggested Articles TP-Link UB500 Review – F.A.Q

F.A.Q

Can I Use Cuzor 12V Mini WIFI UPS With Jio Fibre Internet?

Yes, you can use it without any issues. If for some reason you upgraded your router for a better range then do check the wattage and amp rating before placing the order. This particular model supports 12 watts under 2 amps.

Can I Use Cuzor 12V Mini WIFI UPS With Airtel Fibre Internet?

Yes, we’ve tried a few Nokia routers from Airtel and this UPS has no issues. Just cross-check the amps and wattage required by the WIFI router. It should not cross the 12 watts and 2-amp power requirements.

Thanks for reading! Padhkedekho wishes peace upon you!

2 Comments on “Cuzor 12V Mini UPS Review With 5 Pros & 2 Cons + Alternatives!

  1. Thanks for the info. Was confused about choosing the one for my needs. Finnally ordered this. Lets see how it goes. May i know howz the usp so far,?

Comments are closed.