Tips & Tricks

Should I have Public Or Private Account On Instagram? Big Gap!

[Updated on July 26, 2023] Even today, people are still having many concerns regarding different types of Instagram accounts. One account type will give an open invitation to likes, comments, and followers. On the contrary, the other one will invite privacy protection and your control of the content. So do you ask yourself, should I have a public or private account for Instagram in 2023?

If yes, then we will explain both account types in detail so that you should know what to expect from them.

Hey there! Welcome to Padhkedekho, and let’s get going!

Want is Your Motive?

Gone are the days when Instagram was simple and had only personal accounts. Now, things are different and you’ll see more business accounts! And that’s what we want to talk about.

If this is going to be your “personal account” where you might be sharing happy times, family outings, or general updates with the motive to update your actual friends and relatives then a personal account is best for you.

But, if you have business in mind or ultimately you wish to earn from paid post or collaborations with influencers, models or brands in general then business accounts is the perfect solution.

The scope of this article is for personal accounts. if you are interested in knowing the major differences between a personal account and a business account (professional account) then you can bookmark this website and wait for a while as we are updating that piece of content very soon.

Public Account Vs Private Account On Instagram

On Instagram, a personal account can be either a public account or a private account.

Whenever you’ll make your first account or a new one on Instagram, the account will be public by default. By “public account” we mean that your post, stories, followers, and following will be visible to all the users of Instagram and nothing is exclusive between you and your followers.

If you want to keep things private between you and your followers then a private account is the way to go. By the above explanation, most people will select a public account but stop right here. There are consequences of public accounts that you’ll get to know below. Now, let’s talk about them in detail.

Public or private account on Instagram

Public Instagram Account

The public account is for those users who aim to get entertained e.g. following profiles of celebrities, having social friends, posting stories, liking, commenting, etc. The whole idea is to communicate with people and cherish memories. Just like on Snapchat you can also make new friends and follow people you don’t personally know.

With a public account, your identity will be like an open book. Instagrammers from any region, state, or even different countries can check out your post, stories, and bio! This can be something that you wish to aim but there are a few things you should know beforehand.

Everyone on the internet doesn’t have the same intellect level and can cause you harm of any kind. Hence, while dealing with unknowns you should keep your privacy upfront before anything else.

By default, an Instagram account is public which means anyone can check out your post/stories and can perform a screenshot of the same and may reuse it for bad practice. So, if you are okay with screenshots and stuff then you can choose to have a public account for Instagram. For security, make sure your password is strong enough so that no one can decipher it.

Pros Of a Public Instagram Account

1. Anyone on the entire Instagram user base can communicate with you.

2. All your posts and stories can receive more likes and comments as they will reach more people.

3. Countless people can start following you without any notification

Cons Of Public Instagram Account

1. Your privacy is on the toss.

2. You can’t keep anything hidden on your profile.

Private Instagram Account

If you want to take full advantage of Instagram and user privacy also matters to you then you can convert your account to private.

By making your account private, you are restricting unknown people/stockers to check out your post and stories. Only those profiles that follow you can check out your content.

If someone wants to check your posts and stories then they’ll need to send you a request to follow you for the same. So before accepting their request, you can check their account first and then allow/reject/leave pending their follow request.

But keep this in mind that if you’ll share the post from your private account onto other social accounts like Facebook, and Twitter then the post will be accessible to everyone who has access to the direct link/URL from that social account.

Moreover, If you use hashtags on your posts while your account is private then those hashtags will not link your post to the hashtag group.

Making your Instagram account private is very easy and can be done within seconds. For that, you need to follow a few steps

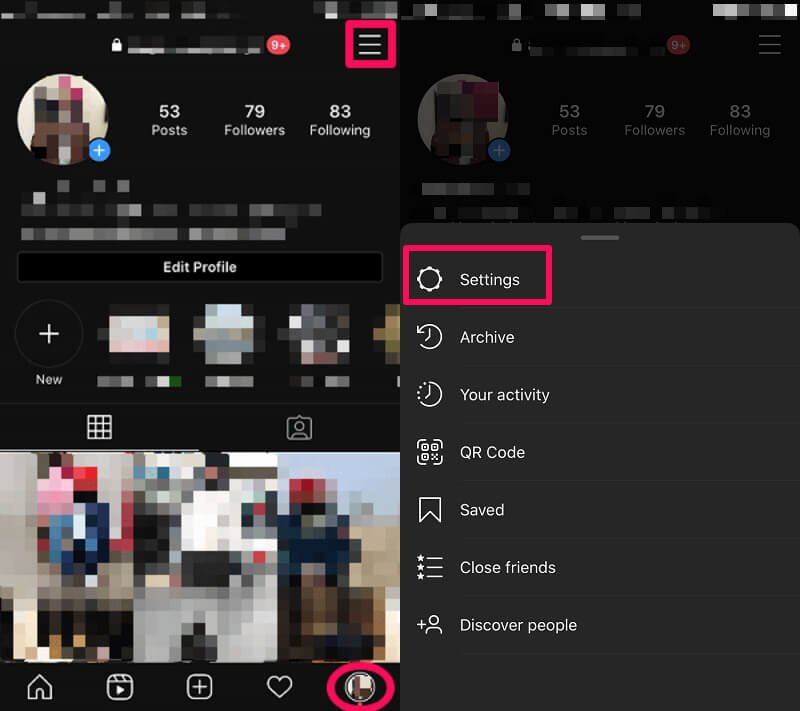
1. Open your profile by clicking the bottom right icon (marked with a circle below). Next, on the top right corner, you’ll see a Hamberger icon (vertical 3 lines), tap on it. Select Settings from the list of options.

Public or private account on Instagram

2. Then select Privacy under Settings. On the Privacy page, toggle the Private Account button to change your account from public to private.

Privacy And Private Mode Insta

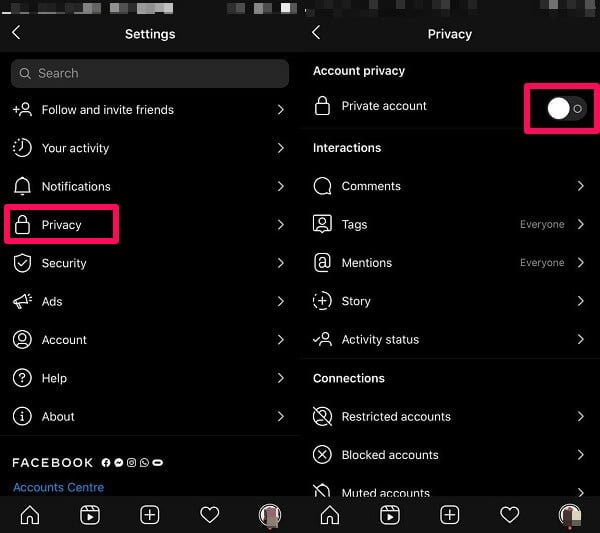
3. After toggling it on you will receive a popup saying Switch to private account, tap Switch to private.

Public or private account on Instagram

By making your account private the data privacy of your account will be maintained, and stalkers will not be able to check out your profile.

To gain something you have to let go of a few things. That holds true for private Instagram Accounts too.

As your account will be private, your posts and stories will reach a lesser audience resulting in fewer likes and views on the posts/stories. So if likes and comments matter to you then a private account will not be a perfect choice for you.

Pros of a Private Instagram Account

1. Your post and stories are shown to those who follow you.

2. The probability of your private images getting reused is quite low.

Cons Of Private Instagram Account

1. Likes and views on your post will decrease.

2. Any users can send you media (photos and videos) to you even if you have a private account.

So Which Instagram Account Is Best For You?

If you are a casual user, Meme creator, influencer, etc. then the public account will be an ideal choice. Your posts and stories will be accessible to every user of Instagram on which they can engage with your content i.e. perform likes, shares, comments, etc.

We recently covered a method that will let you increase your likes and followers for free so definitely give it a try!

On the other hand, a private account is best if you want to share your posts and stories with limited/trusted accounts and want to protect your identity from bad pursuers. You can achieve the utmost level of privacy however at a cost. By making your account private, you will face a decrease in likes, comments, and views on your posts and stories.

These two are the most ideal use case scenarios for Instagrammers. Therefore, make necessary changes by keeping in mind the pros and cons of both accounts and make a selection. If you are not satisfied with the changes from public to private and viz-a-viz then you can always revert within seconds.

After making a selection of the type of account, you will need to make sure to enable 2FA for overall protection.

Two-Factor Authentication (2FA)

As the name applies, 2FA is a security mechanism that will prevent your account from being taken over by someone or hacked. For added security of your Instagram account, you should enable two-factor authentication.

If someone tries to gain access to your Insta profile, you will be notified to enter the special code that will be with you (after setting up) or re-enter your credentials to verify your identity so that Instagram can protect your account.

So if you have a public account or a private account it is better to have 2FA enabled.

To enable 2FA on Instagram you’ll need to follow a few steps. Steps will remain the same for iOS as well as Android phone users.

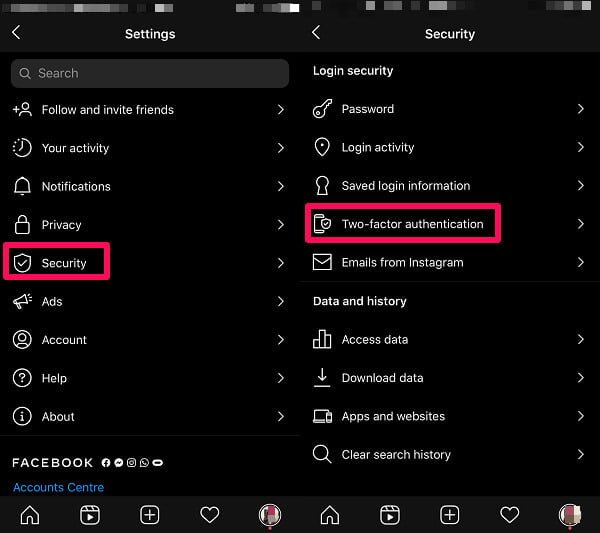
1. Open your profile and tap on the 3 vertical lines (hamburger icon). Next from the list of options, press Settings.

Instagram Profile And Settings

2. Next, click on Security and then Two-factor authentication.

Insta Security 2FA

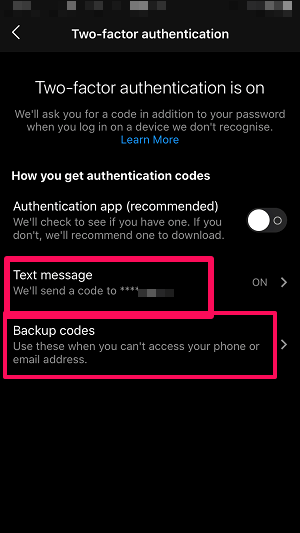
3. From here you’ll need to set up 2 FA for your account so that you have a registered mobile number and a few Backup codes for the emergency.

Enabling 2FA Instagram

So there you go, guys!

Now you know what type of account to choose (public or private account for Instagram). We hope we were quite detailed to explain both of them. If you have any doubts or queries let us know in the comments sections below or DM us on our social media accounts Twitter, Facebook, and Instagram.

Just like this, we also have a few intresting Tips & Tricks that you can check out. Thanks! We’ll see you on the next one!

Suggested Articles!

  • 5 Ways to Protect Your Eyesight While Using iPhone [Free]
    Nowadays work is mostly online and spending time looking at the screens is the need of an hour. It affects eyesight drastically as we use relaxing time “scrolling Reels or TikTok videos”. Apple added 5 features to protect your eyesight while using iPhone that nobody ever talks about. Today at PadhkeDekho, here are the methods that help protect eyesight using iPhones. These are default methods available for free and no subscription is needed. Though depending upon the iPhone mode you have some features might not work. One of these methods is great for lowering your infants/kids’ screen time and overall hate your iPhone! This feature made many of my friends with kids switch to iPhones! If you are also tilting towards the iPhone, here are the best deals you can check out on Amazon. Before coming back to the topic of protecting eyesight while using an iPhone, Welcome to PadhkeDekho, where we keep bringing tips and tricks to make life easier for our readers. if you face any issues or need guidance, ping us on the social accounts below. Let’s start with the first method to protect your eyesight while using iPhone. #1 Dark Mode Protects Your Eyesight While Using iPhone Since the inception of iOS 10, Dark Mode has always been enabled on my iPhones! The reasons are straightforward and you might have been using it for a long time. If you have an iPhone with an OLED display you should enable, it brings quite a few positives to offer. if your eyesight is good, you will be using your iPhone at a brightness lower than 40% while indoors. Dark Mode will lower it and the overall stress on your eyes will also decrease. That’s why Dark Mode is the best method to protect your eyesight using iPhones. Why? Dark Mode in general looks good. The wallpapers change, and even the UI feels fresh and new. Black looks darker in a dark or dimly lit ambiance. It also improves the battery backup on all phones. Majorly the differences are noticed on iPhone with OLED displays. Because on OLED displays only the pixel-emitting nodes consume the battery. This is also true that the Dark Mode is not a cup of tea for everybody (especially the ones with slightly poor eyesight). As a result, people increase the brightness and that’s when Dark Mode loses all the eyesight protection. Dark Mode can be activated via the Action Center or by going to Settings -> APPEARANCE from Light to Dark. To take the experience a notch above, you can play between the Light and Dark modes by enabling the Automatic mode, Via the Options you can make changes like when you need Dark Mode to be applied. #2 Night Shift Remember how we used to have CFL lights or “yellow bulbs” in our house in childhood? That’s exactly when we used to sleep early. What do you think? Let us know in the comments. Yellow color comforts the eyes and signals the brain to sleep it’s nini time! As a result, we used to get sleepy quite early compared to today with white LED lights. Whereas, white does the opposite, and professional places now refer to white lights. White instructs the brain to stay awake and keep doing what you are asked to do without feeling the urge to feel sleepy. So, yes the yellow lights of childhood were the best. In the same way, after the sun downs, the iPhone screen also reduces the white light and increases the yellow emitters more. It also relaxes the eyes and signals the brain to start preparing for the night. You can set it auto, or enable it manually as you feel. Night Shift paired with Dark Mode is a great combination and ultimately helps to reduce eye strain using an iPhone. Also, you can change the tone from less warm to more warm by heading to Settings -> Display & Brightness -> Night Shift -> Color Temperature. #3 True Tone True Tone is an advanced version of Night Shift and reduces eye strain by using an iPhone. True Tone senses your surroundings and changes the colors to set according to the lighting. Let’s say you are in a dim lighting restaurant and then you will notice your screen turning yellowish and brightness also lowers. In the beginning, it feels like the iPhone has all the “control” but you can override it by simply turning it off or increasing the brightness by yourself. It will keep that brightness and make the necessary changes. But after a few days of use, you will enjoy using your iPhone with True Tone. To enable True Tone, head over to the Action Center or go to Settings -> Display & Brightness -> And toggle on True Tone. Note: True Tone consumes more battery it continuously checks for surroundings change. So if your battery backup drops do make changes to the True Tone. #4 How Can Screen Distance Protect Your Eyesight While Using iPhone? Screen Distance is a great feature that solves two purposes; first less screen time and second preventing eyesight degradation. Also, if you have kids it will be even better. They will never ask for an iPhone to spend time. As per Apple, Screen Distance helps reduce eye strain and the risk of myopia in children. With this, the iPhone estimates how closely you are looking at the screen, if it’s too close you will get a full-page alert that will only show the Continue button once you move your phone away to an acceptable distance. It will not be clickable if the distance is not appropriate. Hence kids will have a hard time bypassing it. No swipe works, lock-unlock brings the iPhone to the same state. As a result, kids lose interest by now and toss the phone away. Pressing the button allows you a few minutes of use and if you start using a similar way, it will again pop up, this is frustrating but helps you move the phone a little away. Out of all, Screen Distance and Night Light are the most effective. To enable Screen Distance, head to Settings -> Screen TIme -> Screen Distance -> Enable the toggle. #5 Screen Time Can Also Protect Your Eyesight While Using iPhone! Screen Distance is a leaf from the Screen Time tree! Still not using it? you are losing a lot, my friend. With screen time you can limit your phone usage, and communications and add more restrictions. Trust me, these feel like a burden at the start and spoil the idea of chilling. But the results after a month will be quite shocking. Be prepared to be overwhelmed, there are tons of options to enable or disable, make your changes as it will change the overall time spent on the phone. Once everything is done keep using the phone, and try to limit your urges and not switch to a different phone or tablet! Screen Time has helped lower my screen time from 8 to 3.5 hours. The rest of the time is spent doing what I always wanted, reading and cycling. To enable or disable the Screen Time, headphone to Settings and then Screen Time. Make the necessary changes and continue your daily use. What Do You Think of These Recommendations? There you have it, folks! These are the 5 ways to protect eyesight using iPhone! Feel free to ping us on the social accounts below if you have any questions. We love to help as much as we can. More Tips & Tricks
  • How To Find The IMEI Number Of Any Phone [Updated 2024]
    Other than the invoice or bill of the phone, The thing that can prove your ownership is the IMEI of your mobile phone. And once the phone is lost or stolen it can be tracked down via IMEI number. So you can understand how important it is. To find the IMEI number of your phone there are multiple methods. Let’s face it, when it comes to finding the IMEI number of the phone, most people don’t know how to check it. For some people *#06# is the only IMEI number code for finding the IMEI number. But there are so many other methods that are even more convenient. So in this article, we are sharing with you 5 ways to find the IMEI number of any phone be it an Android or iPhone, or even a feature phone! That’s not all, here you will also get to know how to find the IMEI number of lost phones as well! Without Anything else, Welcome to PadhKeDekho! If you are first time here, we provide helpful tips and tricks like this, to make your life a tad easier! So please bookmark the website! 1. Check IMEI Number On The Phone It doesn’t matter what phone you have. Be it an iPhone or any Android running version 2.2 or a feature phone. All phones have an IMEI number that is unique as per telecom regularity. Dual sim-capable phones come with 2 IMEI numbers in case you didn’t know! On any phone, you can dial *#06# and as soon as you press the last # you will have your phone’s unique IMEI number in front of you. You can note it done somewhere if you are using a feature phone. Otherwise, you can take a screenshot of it and keep it on your smartphone. This is something that you would have already known but wait there is more! Keep on reading! Find IMEI On Android Phone If you have your phone with you then finding IMEI on your Android phone is very easy. We have tried the steps on Android 10 as well as Android 7.1 they are more or less the same. So, head over to Settings -> About phone -> Status -> IMEI information. And here’s your Android phone IMEI number[s]. On newer Android like Android 12, all you need is to follow the above steps till About phone! What if you don’t have your Android phone with you anymore? Then Don’t worry, you can use your Google account to find the IMEI number. Ways To Check IMEI On iPhone Just like on Android, Apple has also given iOS users the flexibility of finding and keeping IMEI numbers in their iPhones. However, Apple provides tons of other ways to check the IMEI of your iPhone. The steps are pretty similar on every iPhone. 1: From The iPhone Open Settings. Tap on General. Then select About. Swipe down and your IMEI number will be there next to Bluetooth! The steps are still the same on iOS 15.6.1 You can keep a copy of the IMEI number on iCloud or any other cloud-based service like OneDrive, Google Drive, Dropbox, etc. 2: Using Apple iTunes If are running on macOS Catalina or above, then you can find the IMEI of your iPhone from the Finder window. To do so, connect your iPhone to the Mac and click on iPhone under Locations in the Finder. You will see the model and the storage available on your iPhone. Clicking on it will show you the current mobile number present on the phone, IMEI, and ICCID. On the Mac versions before Catalina or on Windows PC, the above steps can be done on iTunes software. 3: The Sim Tray Do you know the SIM card tray on your iPhone has an engraved IMEI number on your phone? For that, all you need is the SIM ejection tool. This feature started with the iPhone 6S. So if you have an iPhone 6S or above just pop open the sim tray! For the previous generation’s iPhones (Below 6S) you can find the IMEI on the back of the iPhone. 2. Check The Invoice/Bill So what if you don’t have a phone at the moment but you need IMEI information? for that, the seller of the phone must have kept you covered! You can find the IMEI number of your smartphone on the invoice or bill that you would have gotten on your purchase. Other than the date of purchase, the invoice holds the most important aspect of your phone. And that is the IMEI number. Doesn’t matter if you bought the phone online or offline. 3. The Box Of Your Phone Every mobile manufacturer puts IMEI information on the outer box for easy access. Do you know why? This is done so that you can compare the IMEI number printed on the box with the one on the invoice before tampering with the seal on the phone’s box. As a result, you get confirmation that you have got the correct phone. Moreover, inside the box, IMEI is also present for convenience. So before throwing or dismantling the box do take care of it beforehand. 4. Does Your Android Phone Come With A Sticker? Some Android phones come with a pre-applied sticker on the back. That sticker is none other than the IMEI numbers of your phone. Yes, we said numbers because dual sim smartphones have two different IMEI numbers! Therefore, if you are aiming to use the phone with a case, it’s better to leave the sticker where it is. Or stick it inside the case that you are going to put on. So that when you need to enter an IMEI number let’s say while buying an insurance policy for the phone! 5. Lost Phone But Need IMEI? God forbid maybe you have lost your phone somewhere and you need IMEI to register an F.I.R or a complaint with the cops. If you just want to know the IMEI without using your smartphone then you can find it by following the steps. The good news is, that both Android, as well as iOS, do a great job of accessing the IMEI number without a phone. However, the steps are different and are discussed below. How To Find IMEI Of Lost Android Phone Finding the IMEI of the lost Android Phone is a little complicated for the first-timer so do check the following steps thoroughly. For that, we are going to use Google Dashboard. Google Dashboard keeps track of all the information related to your Android phone, like Serial number, IMEI, etc. along with the app data like YouTube and YouTube Music, etc. But for the scope of this article, we are going to find and download the IMEI information only. So you can download the data and keep a copy with yourself on your computer or Mac. Now let’s have a look at the steps. 1. Log in to Google Dashboard using the same Google Id that was used to sign in on the smartphone. 2. Click on Download your data. if you don’t find this choice tap on Data & personalization. There you’ll find the Download your data option. 3. Google Takeout page will open. Under Select data to include, select the check box saying Android Device Configuration Service. 4. Scroll down until you see the Next step with blue background. Click on it. 5. Now under Choose file type, frequency & destination select Send the download link via email in Delivery method, 6. And just below select Frequency as Export once. Under File type and size, don’t make any changes. Click on Create Export. 7. Within a few minutes Manage your exports page will open that will have information like Created on, Available until, etc. Click on the Blue Download button. 8. The file will download to your computer. Since it is going to be a .zip file you will need to extract it. 9. After extracting, a folder named Takeout will be there. Double-click on it. You will see a folder named Android Device Configuration Service. In the folder, will be a file named Device. Double-left-click on it. 10. The file will open in a web browser. This file will not just contain the IMEI number but also the Android ID, Serial Numbers, Locale, Hardware, etc. And that’s how you find the IMEI number using a Google account! How To Find IMEI Of Lost Or Missing iPhone You can log in to Apple’s official website using the same Apple ID credentials that are used on the iPhone. However, for it to work you need a macOS device running with the same Apple ID. A MacBook or iMac will be required if 2FA (2-factor authorization) is enabled on your iPhone. Because any attempt to sign in using the same credentials will require the 6-digit code sent to your iPhone. Since you don’t have the iPhone anymore you cannot receive and verify it. With a Mac using the same ID will not trigger the passcode while logging in. So that being said, let’s log in. On the bottom, you will find all your Devices using the same Apple ID. Tap on iPhone and voila that’s how you find the IMEI Number using Apple ID on the Apple website. There You Go, Guys! Thanks for reading! If you have any queries or feedback do comment below or reach us out on PadhKeDekho’s Twitter, Instagram, or Facebook! We would love to help! Just like the above article, we share our 2 cents in the form of reviews, tips & tricks, comparisons and opinions so do check out those articles. And if you liked the content do share it with your friends and family! Thanks, we will see you at the next one! F.A.Q
  • Transfer Data From iPhone To Mac For Free (Easiest Methods)
    You can transfer data from iPhone to Mac in various ways. Some methods involve a cable connection and a few truly wireless options are available. Like us do you also believe in a truly wireless data transfer but don’t know how to do that in the Apple ecosystem? Don’t worry we have kept you covered and in this article, we will share everything that is relevant to understanding transferring data from iPhone to Mac Catalina, or Big Sur, and vice versa. So without wasting your time, welcome to PadhkeDekho, and let’s dive into the available options. If you prefer to watch it, then you can check this video. Transfer Files From iPhone/iPad To Mac Popular Methods #1 iPhone To Mac File Transfer Using iTunes You have various options to achieve your tasks. Transfer data from iPhone to Mac by using iTunes. In this approach, if you are connected via lightning port then you’ll not require any wifi/cellular data to transfer files however you’ll need internet if are connecting wirelessly. In both ways, it will take time to sync your iPhone Or iPad depending upon the number of files and their size. #2 Using Cloud-Based Services For File Transfer You can transfer data from iPhone to Mac by using iCloud Drive. With this method, you can upload your photos and videos with the help of Wi-Fi. Various other cloud-based services are available like One Drive, Dropbox, Google Drive, etc. For those cloud-based services, you will be required to have a valid account and tons of internet data to upload the files. Uploading files on cloud storage consumes data and precious time so you’ll need to be patient to complete your task. Also, the free cloud storage is limited so if you have large files in gigabytes then it will cost you financially. So, if are you looking for the quickest method to transfer files that even don’t consume the internet then you can use AirDrop! Let’s look at Airdrop in detail. iPhone To Mac File Transfer Using AirDrop The AirDrop was introduced by Apple in Mac OS X Lion (Mac OS X 10.7) and iOS 7. The primary motive was allowing users to transfer heavy files within minutes and wirelessly. You can also say that Airdrop is a perfect example of truly wireless data transfer! AirDrop is our favorite method for transferring data. It reduces the dependency on transferring data from iPhone to Mac without iTunes. Because AirDrop is speedier than iTunes and doesn’t require a lighting cable you can seamlessly transfer your recent photos and videos wirelessly. Within a few seconds, you will have a copy of the transferred data on your Mac from your iOS device. The best part is that you can also share photos and videos from macOS to iOS and macOS to macOS which we will explain below. When we tried AirDrop for the first time we were speechless because, within a few seconds, a file (1.2 GB) got transferred to our MacBook Air within 10 seconds which was way faster than considering cloud storage and even iTunes. Since then, we shared files via AirDrop. For the first-time user, it might feel complicated but it’s not (trust me!). Let me explain what settings you’ll need to properly use AirDrop. Prerequisite for using AirDrop on your iOS device On your iPhone or iPad, turn on Bluetooth and Wi-Fi. Connection to any device is not required you just need to enable them. In the next step, go to Settings and navigate to General. Under General, you’ll find AirDrop tap on it and make sure either Everyone or Contacts Only is selected. Let’s check the settings on macOS. Prerequisite for using AirDrop on macOS Just like on your iOS device, you’ll need to enable both Bluetooth and Wi-Fi. Connection to any device is not required. If you have a Bluetooth keyboard and mouse connected don’t worry it will cause no effect on the file transfer. Once Bluetooth and Wi-Fi are turned on, leave your Mac device idle and switch over to your iOS device. Transfer Data From iPhone To Mac Using AirDrop Select the photos and videos you want to transfer from your iPhone or iPad. You can even select all the photos and videos from your iPhone library! After making your selection, tap on the share icon (pointed below) After pressing the share icon select the AirDrop icon from the list of available options. Tapping on AirDrop will open the AirDrop panel. There you’ll see all the available Apple products within the range with which you can share the data. That’s right, you can not only copy the data to a Mac but also to an iPhone! If your device isn’t on the list then, cross-check the Bluetooth and Wi-Fi settings on both devices. Once you see the desired target device on the list, tap on it. You will hear a sound from the target device upon a successful connection. Afterward, file transfer will begin instantly. Voila! The selected files are now available in the Downloads folder on your Mac! Just like that within seconds and without using any 3rd part software. Now let’s check out how to transfer photos and videos from Mac to iPhone. Transfer Files From Mac To iPhone Using AirDrop Unlike iOS, on Mac, you get multiple ways of sharing files from Mac to iPhone via AirDrop. Some of the easiest methods are:- #1 The Old School Guy In this method, you copy the files to the desktop and then perform a few sets of commands mentioned below. In this approach, the probability of selecting something which is not required is negligible. So to use this method you’ll need to copy the required files on the desktop. Right-click on any of the files (double tap on the trackpad if you’re not using any external mouse) Tap on Share and select AirDrop from the options. On the next screen, the AirDrop panel will open. From there you will need to select the iOS or Mac device. Tapping on the profile photo or the account name will begin the transfer. After selecting the device, you will hear a tone on the target device confirming the initializing transfer. if you have transferred files to a Mac then you’ll find those in the Downloads folder on the Mac. Photos and videos shared to an iOS device will be available in the Photos app on iOS devices. On the Mac, you’ll get a popup like this. Tap on Done to close the AirDrop dialog box. #2 The Drag and Dropper If you are a drag-and-drop kind of user then you’ll enjoy this approach. Just the way we did on iOS, select the n number of files you want to transfer to an iPhone from your Mac. Once you have selected the files click on AirDrop under Favourites on the Finder. It will open the AirDrop panel. Here you’ll see the list of nearby Apple devices. Don’t click on any profile just remember their location on the map. Now open the folder where you have the desired files. Select the files and drag-drop them on the target AirDrop device. Within seconds, the shared media will be available on the iPhone or iPad! How Does AirDrop Works? AirDrop transfers files between devices using an ad-hoc network. In layman’s terms, your Apple device will form a small network that is under 40 feet (13 meters). If you are planning to AirDrop files between devices at your home then don’t worry your files are safe. But you should keep AirDrop settings to Contacts Only if you are going to share files in public places. To change the AirDrop settings on your iPhone, go to Settings and navigate to General. Under General, you’ll find AirDrop tap on it and make sure Contacts Only is selected. On Mac, in Finder, you’ll find AirDrop in the Favourites. From there you can change the settings to Contacts Only. Should You Use AirDrop? The most important thing is time. and if you value it then AirDrop is a blessing! Transferring data from iPad to Mac using AirDrop is quite seamless. if you are a photographer or video creator then AirDrop can help you in saving time without consuming any precious internet data of yours while on the move. But you have to be careful about a few things. As AirDrop forms a public network by using Wi-Fi and Bluetooth then all the iPhones or Macs within the range can be intercepted. So before transferring the data as a precaution change the AirDrop settings to Contacts Only. Along with that, when you are done sharing files disable Bluetooth and WI-FI when not using it. So there you go, guys! I hope we were detailed enough to explain how to transfer files from iPhone to Mac via AirDrop and viz-a-viz. If you have any concerns then don’t hesitate and drop us a comment below. Perhaps, you can reach us on our social handles Twitter, Instagram, and Facebook. FAQ Q: How to transfer data from iPhone to iMac? A: If your iPhone and iMac are running iOS 7 (or above ) and Mac OS X Lion (Mac OS X 10.7) or above then you can take advantage of AirDrop which is explained in this article. Q: How can I transfer files from iPhone to Mac? A: You can transfer files by using iTunes, iCloud, and even AirDrop which we have explained in this article. Q: How to transfer videos from iPhone to Mac without cable? A: For a wireless connection, you can use iCloud or AirDrop (recommend). All you need to know is here. Q: How to transfer photos from Mac to Mac wirelessly? A: The best way is by using AirDrop as it will be quick with no internet requirement. If you don’t know how to AirDrop then click on this link. Q: How does AirDrop works? A: AirDrop forms an ad-hoc local area network in which you can share files between Apple iPhone, iPad, iPod, MacBook, iMac, etc. wirelessly and instantly! Q: How do you use AirDrop? A: AirDrop lets you share files between Apple products in a close-range network using Bluetooth and WI-FI. Q: How do I AirDrop photos from iPhone to iPhone? A: By using AirDrop you can share photos and even videos from iPhone to iPhone. Hey there! Just like the above article, at PadhKeDekho we share our 2 cents in the form of reviews, tips & tricks, so do check out those articles. And if you liked our content do share it with your friends and family! Thanks, we will see you at the next one!
  • How To Make Custom Ringtone For iPhone Without iTunes [Tested]
    Even in 2024, the steps to make a custom ringtone for an iPhone without iTunes are quite similar. Though you will find screenshots on iOS 14.6 the same steps are confirmed on iOS 17.5.1. So, this article holds all the value! iPhones are very common and the majority of people use the same “Opening” default ringtone. Whenever it rings, everyone takes out their iPhone and guesses it is not theirs! If you also lived the scenario then you can understand better. To break this monotonous behavior you can make your iPhone unique by putting customized ringtones to your liking. And guess what you can create a ringtone for iPhone without iTunes or Garageband! Today we will be sharing with you the easiest way to create a ringtone for an iPhone without iTunes and Garageband. Don’t get me wrong you can get new ringtones by simply buying them from Apple’s iTunes Store. But the choices are limited. By our method, you can select any song to create a ringtone for your iPhone, which is completely free and legitimate! In this article, you will not only know how to make a ringtone but also how to set a ringtone on iPhone without iTunes. Using safe and secure software that will let you make your favorite song as a ringtone for free! So without saying much, welcome to PadhKeDekho, and let’s get started! How To Load Ringtones On iPhone Easy In order to make a ringtone for iPhone without iTunes and Garageband, you’ll require a few things. Using 3uTools For Making Custom Ringtones The easiest way to set a ringtone on the iPhone is by using 3uTools which is completely safe and free to download software. It never gives any unwanted notifications or ads and it is completely safe to use, as we have been using it for a while now. Once you have successfully made your ringtone[s] you can easily uninstall the software just like that. After the software is installed, connect your iPhone and launch the 3uTools software. How To Use 3uTools For Making Ringtone For iPhone After launching the 3uTools, you will be greeted on the Info page. Where you can find important information like IMEI, UDID, Battery Life Cycle of your iPhone, etc. Then head over to the Ringtones tab that you will find on the left panel or Make Ringtone on the bottom center. 3uTools will allow you to choose any music, voice memos, and even a video file that can be converted into a ringtone! For selecting the file you can choose the location either From PC or From iDevice itself. Once you have browsed your file select it and click open.  After selecting the file you will arrive at the Make Ringtone page. On the top, you will find the file name. Just below it, there will be a graph where 3 pointers; White, Red, and Yellow will be present. The White one represents the starting point of the ringtone. Whereas, Yellow marks the endpoint. To scribble on the song, you can use the Red pointer. Keep it in mind that the duration of your ringtone can’t go above 30 seconds so choose accordingly. Rest you have options for Volume and Fade-in which you can change but increasing volume above 100 percent will make the ringtone sound distorted. For the best quality, we will suggest not making any changes to any of the two. After selecting the portion for the ringtone, click the Generate Ringtone button which you can see in the above picture, pointing by a Blue arrow.    Then you will see a popup that will ask you for the ringtone name. But you should refrain from using file extensions while naming your ringtone. Once the name is given click on the Import to your iDevice button. That’s it! Your custom ringtone is ready and is also synced to your iPhone! Ways of Check Whether the Ringtone is Synced to Your iPhone Or Not 1. Using 3uTools Software Click on the Ringtones on the left side under the iPhone tab. You will be shown all the custom ringtones you have created. In our case, there are two ringtones. 2. Using Your iPhone The second method (the most favorable one) is to head over to your Sounds & Haptics options in the Settings of the iPhone and voila you will see your customized ringtones there. Removing Custom Ringtones From iPhone Let’s say you made a few ringtones and you didn’t like those. Then using 3uTools and your iPhone you can remove the ringtones very easily. All you need is to connect the iPhone again to the Windows computer. Removing a ringtone is easier than adding one! You can achieve the task in 2 ways:- 1. Using 3uTools To Remove Custom Ringtone Remove the ringtone from your iPhone as well as the 3uTools library. Connect the iPhone to the Windows computer. Head over to the Ringtones tab that you’ll find on the left panel. Once the Ringtone tab is open, tick the check box next to the ringtone that you want to delete. Then press the Delete Button(pointed above). Then you’ll get a popup saying ” Sure you want to delete this ringtone?” and hit Delete. And that’s how you delete ringtones from your iPhone using 3uTools. 2. Removing Ringtones From iPhone If you don’t want to use any software to remove the ringtone, then don’t worry you can do that from your iPhone as well. For that, Head over to Sounds & Haptics under Settings. There you’ll see all the custom ringtones above a borderline. Swipe to the left on the ringtone you want to delete. Then press Delete and voila! The ringtone is no more available on your iPhone! And that’s how you can add or remove ringtones from your iPhone as well as 3uTools. PadhKeDekho Logging out!
  • 11 Reasons Why Should You Upgrade To Windows 10
    Windows 10 was introduced in 2015 and since then it has received numerous software updates that brought multiple improvements. We tried Windows 10 when it was new and didn’t enjoy it. But Love got redone after switching from Windows 11! Here are 11 reasons why should you upgrade to Windows 10! Therefore, I am sharing a few things you would love after upgrading from the earlier Windows. I upgraded from Windows 8 to Windows 10 64-bit. So welcome to Padhkedekho and let’s get started with Windows 10 features… 1. Look And Feel Just look at the desktop and tell me ain’t that beautiful and modern looking! This is a native Windows 10 wallpaper that is provided on Windows 10 Pro. All my most used applications are pinned to the taskbar which feels modern & futuristic compared to Windows 8. While clicking on the pinned icons on the taskbar it gives a new vertical animation effect below the icon. The animation is subtle however enhances the overall experience. Below you can see that Edge and Explorer are open and the vertical lines are there. As I was using Windows 8, Microsoft Store access has retired way back because of which you don’t see app icons on the taskbar on the left image. As Windows 10 is new it feels more polished which makes it better appealing to the eyes and feels more modern. On the left, you can see there is no Start button which was removed in Windows 8 and there are a few favorite apps on the taskbar. While on the other side, you can see a search icon along with other pinned apps which reduces the opening time of applications for better time management. 2. Best File Explorer Ever Microsoft has not only worked on polishing Windows 10 but also improved the functionality of the operating system. To begin with, let’s compare the File Explorer on both Windows versions. In Windows 8 when you click on File Explorer it takes you to the Libraries from where you can access files in Documents, Music, Pictures, and Videos. On the left panel, you have default settings for Desktop, Downloads, Recent places along with Libraries and Computer hard disk partitions if any. In Windows 10 when you click on File Explorer it shows you Frequent folders and Recent files which is very helpful and time-saving if you have already visited any folder or file. On the left panel, you can see pinned locations where I have pinned the “Dell keyboard” folder. It helps me to access the folder and its content to the earliest rather than personally navigating to the source location. Pinning a folder is very easy; just right-click on any folder and select “pin to quick access”.       3. Windows 10 Dark Mode Since the day I got Dark Mode on my iPhone, I wanted the same on my Windows computer. There are ways of getting Dark Mode on Windows 8 by doing certain tricks and hacks which certainly I didn’t wish to perform. The very first thing I did after installing Windows 10 was head over to Personalization and then select Black in the Color Setting! As the name applies Dark Mode will be applied everywhere in the operating system. Dark Mode on Windows 10 was a very crucial reason that made me upgrade to Windows 10!    The Dark Mode not only just looks better but it also reduces the white light coming out of the monitor resulting in lesser eye stress and pain as mostly I used my computer in the night for around 3 to 4 hours with the lights off. I have been using Dark Mode and Windows 10 for only one week now. And I don’t think I will be able to go back to Light Mode or even Windows 8 ever! 4. Edge Is The New Windows Internet Explorer! You know that Internet Explorer has never been people’s choice of browser and we know the reasons however this new browser from Windows is simply very refined. To begin with, as soon as you click the edge button launcher you will be in a very well-known place(Similar to Google Chrome) from where you can link or make shortcuts to your favorite websites on the Bing homepage. I generally use very few tabs and Edge has not disappointed me even once. This was something that I was not expecting from Internet Explorer! Just like any other browser Edge also supports Extensions(even Google Chrome’s extensions). I only needed Grammarly which was easily available at the Microsoft store. As per my initial experience, Edge is my default browser and I am not looking forward to any other browser on my computer. 5. Newer and updated apps Since I was using Windows 8, the Windows Store was no longer available to access. This simply made me mark my frequently used app’s websites as a favorite on the taskbar and access the same when I wanted it. On Windows 10 I have installed all my essential applications on the computer. Now I can take advantage of the Mobile apps on the computer rather than the Website view. Just have a look at the most popular games on Windows 10.  6. Task View Task View is a new feature on Windows 10 which initially I ignored but now I am using it more frequently. Let’s say you were browsing and got a nice article and you accidentally closed it now what will you do? You will click CTRL + H for History on any browser and select the desired link. But now with Task View, you can see all your recently viewed web pages for easy access. Not only web pages but also recently used files. It’s more like a convenience rather than a feature. 7. Better Windows Settings panel Don’t get me wrong Windows 8 settings panel does look good but not as good as the Windows 10 Setting panel. The Windows 10 Setting panel looks more professional and well-sorted. The settings page provides even more control of Windows which was not the case with Windows 8. I could have ignored this point but when I was playing around in the Settings panel I was freaked to see so many options. It felt good that Microsoft has allowed making so many changes according to one’s preference than before.   8. Windows 10 is Still The Best Windows Ever! Windows 11 is here, and still, people prefer Windows 10 as Microsft keeps to keep Windows 10 live till 2025! This means people are not ditching Windows 10 for 11. Maybe, stability can be a thing? Windows 10 has been on the market for a long now and it’s very compatible with older hardware too. Unlike Windows 11, which needs a relatively new TPM 2 which can be seen on the latest devices which not all people have. Therefore, Windows 10 exists and is highly in demand. 9. Most Secure Windows Ever Every new iteration brings more security to the table than the previous year’s ones(in my case around 8 years!). Since my childhood, I have only had access to Windows. I have used Windows XP, Windows Vista, Windows 7, and Windows 8(which I recently upgraded to Windows 10). The point of bringing this up is that I never had any issue in terms of security on any version.  Yes, I am aware of some ransomware hacks which affected Windows users but I believe it can happen on any operating system because nothing is 100% secure. As a customer, we can stay up-to-date with software updates.  10. Night Light Windows 10 not only brings Dark Mode but also Night Light. As the name implies, Night Light in the Night converts the blue light coming out from the screen to slightly Yellowish. This is very important because blue light prevents your eyes from feeling tiredness and will keep you awake all night. However, with the Night Light, the screen will turn yellowish that will signal your brain to make you sleepy and you’ll sleep rather than stay all night watching videos! The night light can be enabled by clicking the Notification button(which is the second bottom from the right on the taskbar) and then toggling the Night Light button.  You can only toggle it on and off from the Notification Center if you wish to make a few changes you. You have to achieve that by heading to Settings and then Display. From there you can also enable the Night Light.  11. Faster If you are on Windows 7 then my dear you are missing the party! When I upgraded from Windows 7 to 8 the speed difference was a lot and now it’s even more after upgrading to Windows 10. Don’t believe me try it yourself and let me know in the comment section!  So Should You Upgrade To Windows 10? If the above features matter to you then you should immediately upgrade to Windows 10. Even as of now, you can upgrade to Windows 10 for free! Give it a shot and trust me your experience will be amazing. So by any means, you are not getting the free update you can always check out Amazon for deals running on Windows 10 OEM as well as retail packs!  One more thing to keep in mind is that the latest version of Windows 10 packs a lot of security with it. So you are all covered with the latest features and security from Microsoft.  If we were of any help then do share this article with your friends and family. You can also check out other blogs and following us on our social accounts will bring you the latest notifications before anyone else! We will see you on the next intresting one!   
  • Top 5 Moto G9 Camera Features And How To Use Them!
    While reviewing the Motorola Moto G9, we came across unique camera features on this phone. Usually, Moto phones offer limited tweaks in the camera but Moto G9 is different. Motorola has included a host of Moto G9 camera features for better photography as well as convenience. In this Moto G9 camera review, you will find detailed explanations of the camera features and how to effectively use them! So without saying much let’s dive in and check out those features! Moto G9 Best Camera Features On this latest iteration of the G series, Motorola has included various camera modes that were simply not present in the previous versions. Along with those camera features you can also take advantage of Automatic Intelligence (AI) in the camera department. Since Moto G9 packs in Snapdragon 660 SOC, you can take advantage of AI! As we have upgraded from Moto G Turbo, there are so many features to talk about, however, our favorite Moto G9 camera features are shared below! Let’s have a look at those. 1. Leveller Pictures look good when they are properly aligned I.E. (not tilting in any direction). A little tilt in personal photos is okay but when it comes to social media then those shots will not be pleasing enough. Leveler on Moto G9 will help you take those photos which will look good on Instagram or other social media platforms. Along with leveler, if gridlines are enabled then it will also help to enhance your photography skills. To enable the leveler feature you will have to visit camera Settings by clicking the Settings icon in the camera. Under Capture settings, you will see a toggle next to Leveller. Turn it on. Once you have enabled the above you will start seeing two white Horizon lines while taking a shot. One line will be constant (dark white) and the other one will represent the tilt (light white). If you are not holding your phone straight, that will be depicted by a light white line. Move the phone until a straight line is formed. You will be required to match both line segments until they merge as one and change their color to golden. Let’s have a look at how it works and the results of using Leveller! Are you able to find any difference in the above pictures? No problem if you didn’t find any because it is marginal! Both images are 99 percent identical. The difference lies in the top of the door and the wall above it. The right shot shows the door and the wall as parallel, which is not the case in the left one as it is cutting the door and the wall simultaneously. The difference in the above pictures is marginal and most likely average people will not notice. However, if you have enabled the photo leveler on your Moto G9, then it will help you take next-level pictures! 2. Spot Colour As the name applies it will spot color i.e. highlighting the primary object and de-coloring the rest of the elements. In other words, it will let you select a particular part of the picture that you wish to be the center of attraction. Enabling Spot Colour on Moto G9 is very easy. All you need is to press the 9 dots in the camera options and tap on Spot Colour. After enabling the feature you’ll be able to tap on the particular area of the picture that you want to be highlighted resulting in reducing the colors of the other elements before taking the picture. By doing so you will get a result like this. In the above pictures, you can see that the highlighted object (Red scissor) has not lost any color except for other products. This feature will let you present better pictures with clear intentions. Moreover, if leveler is enabled then your photos will look good on Instagram and Facebook for sure! 3. Cutout Camera Feature Does the background of your photos prevent you from posting them online? If yes, then the Cutout camera feature will be interesting for you! With this feature, you can turn a dull background into something which is much more happening. This camera feature is entirely dependent on your imagination. Perhaps, you can use it for fun and creativity. The way we did above! Cutout camera feature can be toggled by going into Photos and Videos mode and tapping on Cutout. Once the mode is enabled, clicking any picture will result in a black background that is replaceable. All you need is to tap Add Background on your latest Moto G9. Let us show you how! The cutout camera feature for Moto G9 can be a great way of producing animated photos and graphics. And if you have to have a kid at home then it can be a great way of entertainment. Note: For the camera cutout feature to work you need to have a person’s face in the picture otherwise it will not work. AI Camera Settings On Moto G9 Because of the Snapdragon 660, Moto G9 supports automatic intelligence options for the camera. All of the features are interesting and quite handy in day-to-day camaca activities. There are multiple AI camera settings, out of which our favorite is Auto Smile Capture. Let’s have a close look at it! 4. Auto Smile Capture While taking a selfie do you struggle to capture everyone in the frame and the result is a blurry image? If yes, then you’re going to love auto smile capture on Moto G9! Thanks to the inbuilt AI, Moto G9 will automatically take a photo when all the person(s) in the photo are smiling! You will find it gimmicky however it works pretty much all the time. Also, because of this feature, it will make your smartphone look cool to people! According to us, it is one of the best Moto g9 camera features. Auto smile capture can be enabled by going into Camera Settings and then under AI settings, enabling Auto Smile Capture. 5. Gesture Selfie Gesture selfie is a cool Moto G9 camera feature. It will help you in taking selfies by just showing your palm in the camera. The best part about this feature is that it will give you a timer for 3 seconds so that you can pose accordingly. While testing this feature, we use it extensively and it worked seamlessly. You will find the Gesture Selfie in the AI settings under Camera Settings. Toggle Gesture Selfie (just below the Auto Smile Capture). Other AI Camera Features Along with Auto Smile Capture and Gesture Selfie feature, Moto G9 offers other AI features like Smart Composition and Shot Optimization. While the prior operate before taking the pictures. These two features are related to clicking post-processing to enhance the images. Smart Composition will format the photo with the rule of thirds so that the images will come out similar to a professional level. With the help of Shot Optimization, your photos will be enhanced based on the AI calculations and the current time scenarios for the scene i.e. day, night, evening, sunset, etc. If both the above features are enabled in the camera settings then, nothing can stop your photos from being remarkably amazing! There you go, guys! These were our favorite Moto G9 camera features after testing the cameras. We hope these features will also come in handy for you and help in enhancing your photography skills! Hey there! Just like the above article, we share our 2 cents in the form of reviews, tips & tricks, so do check out those. And if you liked our content do share it with your friends and family! Thanks, we will see at the next one!