While reviewing the Motorola Moto G9, we came across unique camera features on this phone. Usually, Moto phones offer limited tweaks in the camera but Moto G9 is different. Motorola has included a host of Moto G9 camera features for better photography as well as convenience.
In this Moto G9 camera review, you will find detailed explanations of the camera features and how to effectively use them! So without saying much let’s dive in and check out those features!
Moto G9 Best Camera Features
On this latest iteration of the G series, Motorola has included various camera modes that were simply not present in the previous versions. Along with those camera features you can also take advantage of Automatic Intelligence (AI) in the camera department.
Since Moto G9 packs in Snapdragon 660 SOC, you can take advantage of AI! As we have upgraded from Moto G Turbo, there are so many features to talk about, however, our favorite Moto G9 camera features are shared below! Let’s have a look at those.
1. Leveller
Pictures look good when they are properly aligned I.E. (not tilting in any direction). A little tilt in personal photos is okay but when it comes to social media then those shots will not be pleasing enough.
Leveler on Moto G9 will help you take those photos which will look good on Instagram or other social media platforms. Along with leveler, if gridlines are enabled then it will also help to enhance your photography skills.
To enable the leveler feature you will have to visit camera Settings by clicking the Settings icon in the camera. Under Capture settings, you will see a toggle next to Leveller. Turn it on.
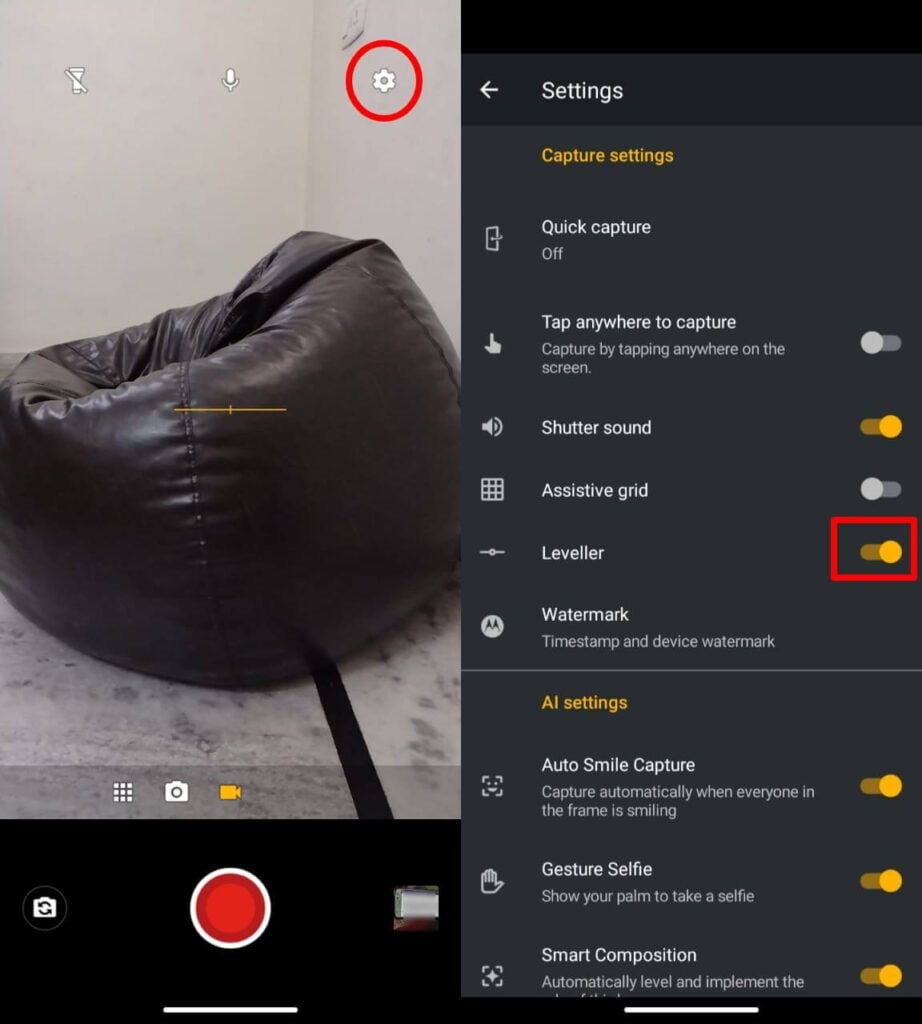
Once you have enabled the above you will start seeing two white Horizon lines while taking a shot. One line will be constant (dark white) and the other one will represent the tilt (light white).
If you are not holding your phone straight, that will be depicted by a light white line. Move the phone until a straight line is formed.
You will be required to match both line segments until they merge as one and change their color to golden. Let’s have a look at how it works and the results of using Leveller!

Are you able to find any difference in the above pictures? No problem if you didn’t find any because it is marginal!
Both images are 99 percent identical. The difference lies in the top of the door and the wall above it. The right shot shows the door and the wall as parallel, which is not the case in the left one as it is cutting the door and the wall simultaneously.
The difference in the above pictures is marginal and most likely average people will not notice. However, if you have enabled the photo leveler on your Moto G9, then it will help you take next-level pictures!
2. Spot Colour
As the name applies it will spot color i.e. highlighting the primary object and de-coloring the rest of the elements. In other words, it will let you select a particular part of the picture that you wish to be the center of attraction.
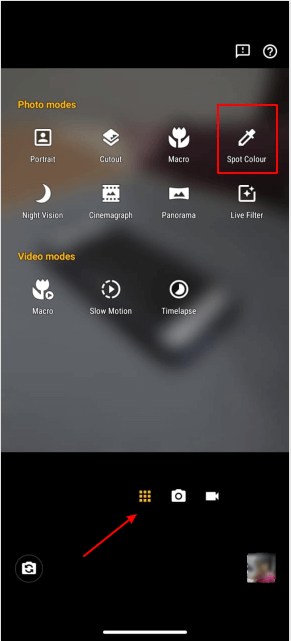
Enabling Spot Colour on Moto G9 is very easy. All you need is to press the 9 dots in the camera options and tap on Spot Colour.
After enabling the feature you’ll be able to tap on the particular area of the picture that you want to be highlighted resulting in reducing the colors of the other elements before taking the picture. By doing so you will get a result like this.
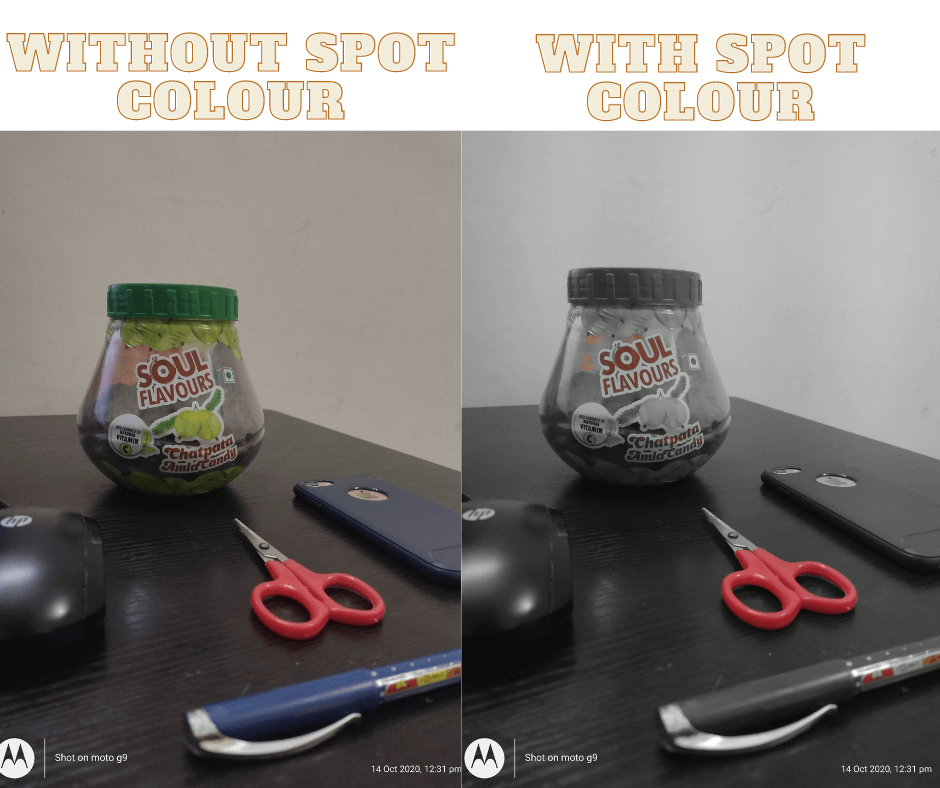
In the above pictures, you can see that the highlighted object (Red scissor) has not lost any color except for other products. This feature will let you present better pictures with clear intentions. Moreover, if leveler is enabled then your photos will look good on Instagram and Facebook for sure!
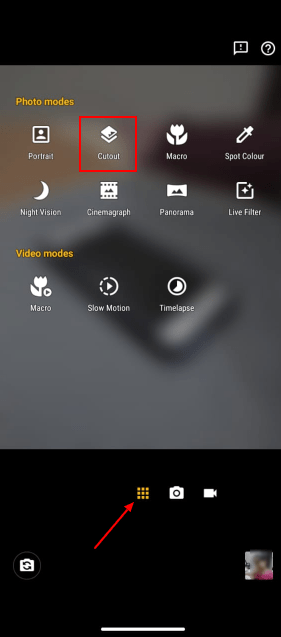
3. Cutout Camera Feature
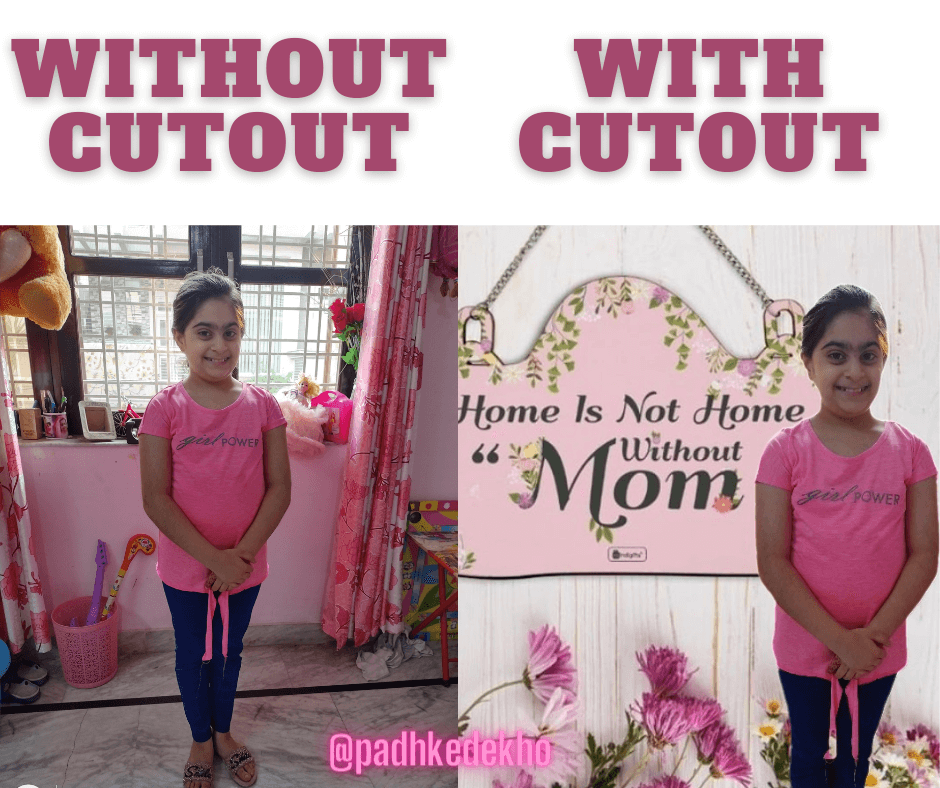
Does the background of your photos prevent you from posting them online? If yes, then the Cutout camera feature will be interesting for you! With this feature, you can turn a dull background into something which is much more happening.
This camera feature is entirely dependent on your imagination. Perhaps, you can use it for fun and creativity. The way we did above!
Cutout camera feature can be toggled by going into Photos and Videos mode and tapping on Cutout.
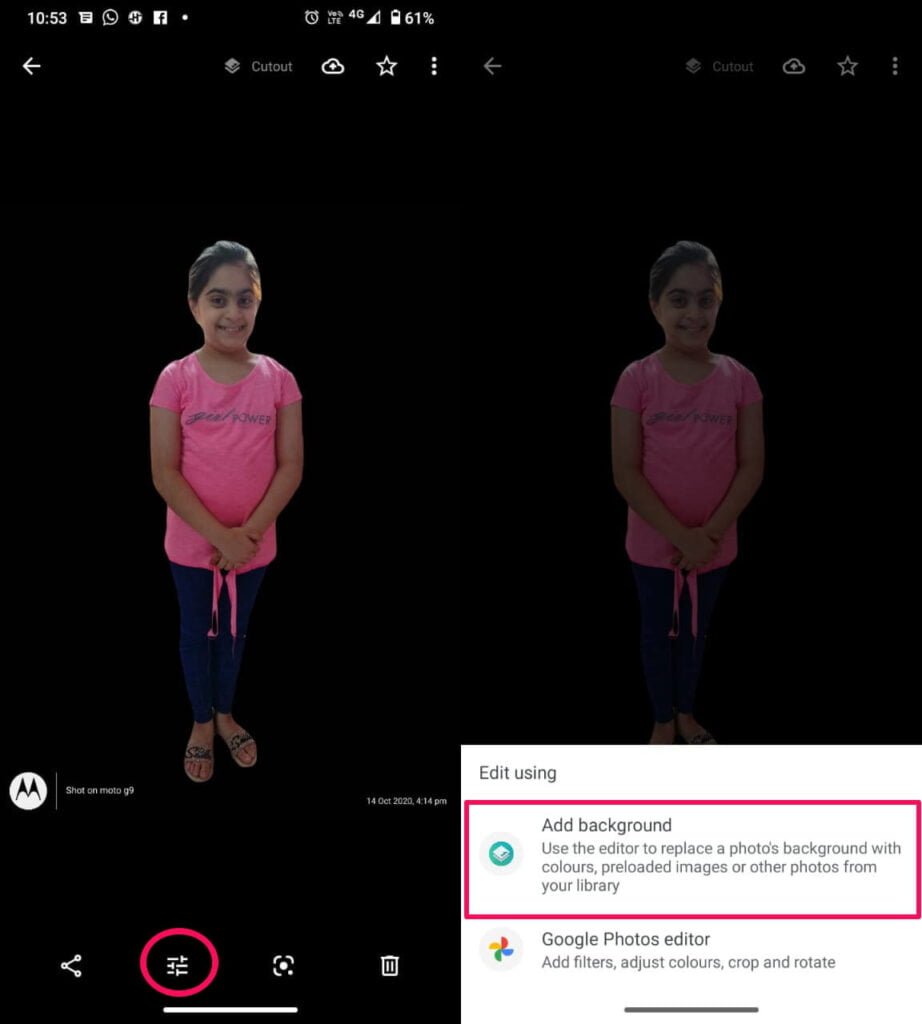
Once the mode is enabled, clicking any picture will result in a black background that is replaceable. All you need is to tap Add Background on your latest Moto G9. Let us show you how!
The cutout camera feature for Moto G9 can be a great way of producing animated photos and graphics. And if you have to have a kid at home then it can be a great way of entertainment.
Note: For the camera cutout feature to work you need to have a person’s face in the picture otherwise it will not work.
AI Camera Settings On Moto G9
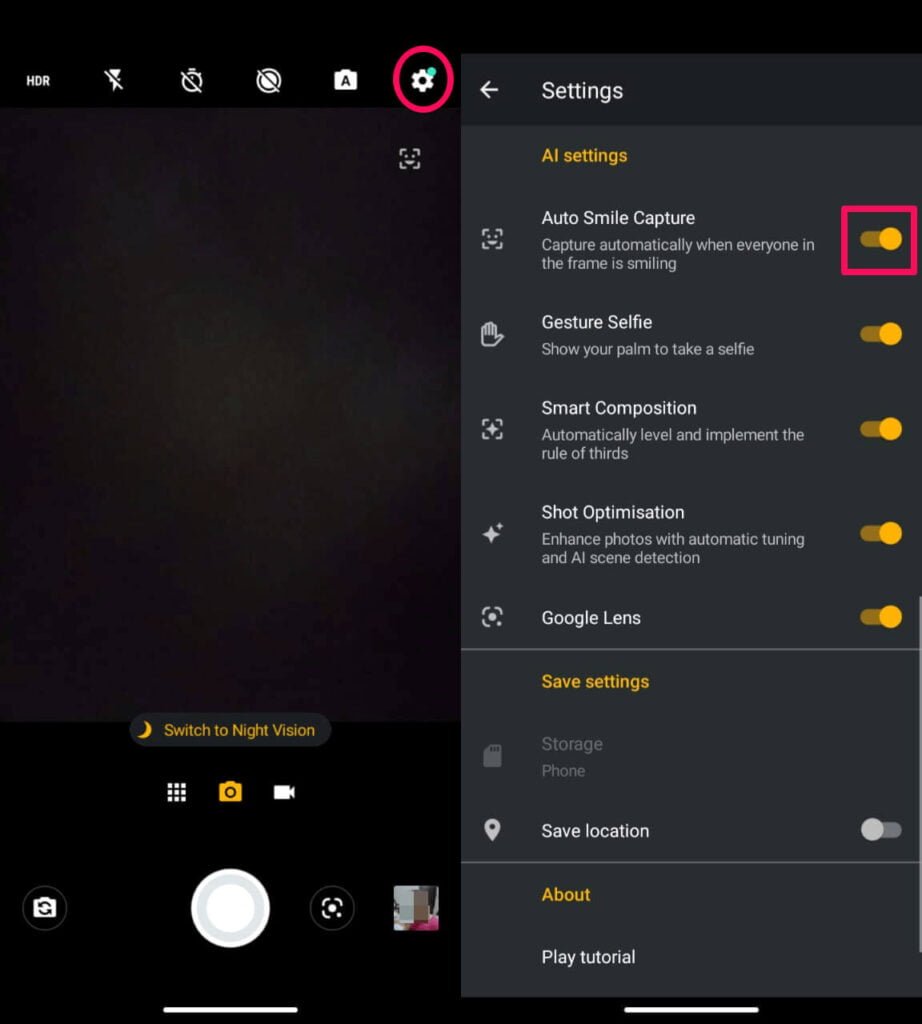
Because of the Snapdragon 660, Moto G9 supports automatic intelligence options for the camera. All of the features are interesting and quite handy in day-to-day camaca activities. There are multiple AI camera settings, out of which our favorite is Auto Smile Capture. Let’s have a close look at it!
4. Auto Smile Capture
While taking a selfie do you struggle to capture everyone in the frame and the result is a blurry image? If yes, then you’re going to love auto smile capture on Moto G9!
Thanks to the inbuilt AI, Moto G9 will automatically take a photo when all the person(s) in the photo are smiling! You will find it gimmicky however it works pretty much all the time.
Also, because of this feature, it will make your smartphone look cool to people! According to us, it is one of the best Moto g9 camera features.
Auto smile capture can be enabled by going into Camera Settings and then under AI settings, enabling Auto Smile Capture.
5. Gesture Selfie
Gesture selfie is a cool Moto G9 camera feature. It will help you in taking selfies by just showing your palm in the camera. The best part about this feature is that it will give you a timer for 3 seconds so that you can pose accordingly.
While testing this feature, we use it extensively and it worked seamlessly.
You will find the Gesture Selfie in the AI settings under Camera Settings. Toggle Gesture Selfie (just below the Auto Smile Capture).
Other AI Camera Features
Along with Auto Smile Capture and Gesture Selfie feature, Moto G9 offers other AI features like Smart Composition and Shot Optimization. While the prior operate before taking the pictures. These two features are related to clicking post-processing to enhance the images.
Smart Composition will format the photo with the rule of thirds so that the images will come out similar to a professional level. With the help of Shot Optimization, your photos will be enhanced based on the AI calculations and the current time scenarios for the scene i.e. day, night, evening, sunset, etc.
If both the above features are enabled in the camera settings then, nothing can stop your photos from being remarkably amazing!
There you go, guys!
These were our favorite Moto G9 camera features after testing the cameras. We hope these features will also come in handy for you and help in enhancing your photography skills!
Do you have doubts or queries? Connect us via social accounts. We would love to help you out! Thanks for reading guys!
Hey there!
Just like the above article, we share our 2 cents in the form of reviews, tips & tricks, so do check out those. And if you liked our content do share it with your friends and family! Thanks, we will see at the next one!