Have you also come across an online document that needs a smaller file size photo? Or perhaps you have a few images for your next blog article and wondering how to reduce image size which will help in faster response time?
If you are going through any of the scenarios you are in the right spot! In this article, we have shared 3 methods to help you reduce image size by up to 80 percent or even more!
All the steps to reduce image size are free and without any trials. Moreover, you can edit and even customize the images to your liking.
So without anything else, welcome to PadhKeDekho, and let’s get started!
Steps To Reduce Image Size For Free
The methods we are going to use are Canva, Tinypng, and your computer’s default photo editor. All this works hand in hand to help you reduce image size. So that being said, let’s first have a look at Canva.
#1 Setting up Canva
If you don’t know Canva is a great template website that can let you make customized Youtube thumbnails, Instagram posts, office presentations and so much more for free. If you are not aware of Canva then don’t worry we will explain everything from setting up to how to reduce image size for free and instantly.
The photo I am going to use has a dimension of 4000 x 6000 px and a size of 1.53 MB.

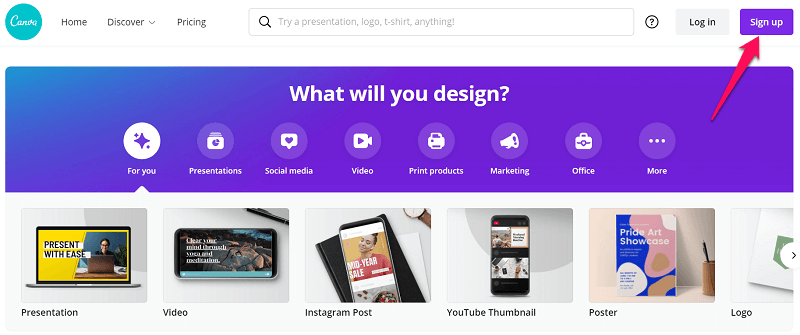
Step 1. Getting started with Canva is very easy. Just open the official website and click on Sign up.
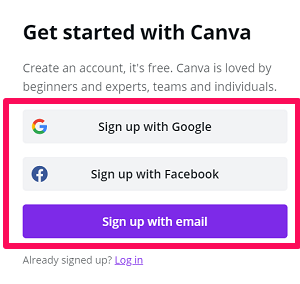
Step 2 You can Sign up for Canva, via 3 options.
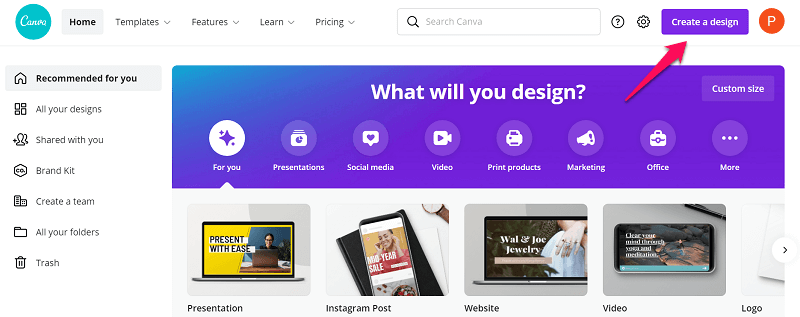
Step 3 After creating an account, within seconds you will be up and running. Click on Create a design button.
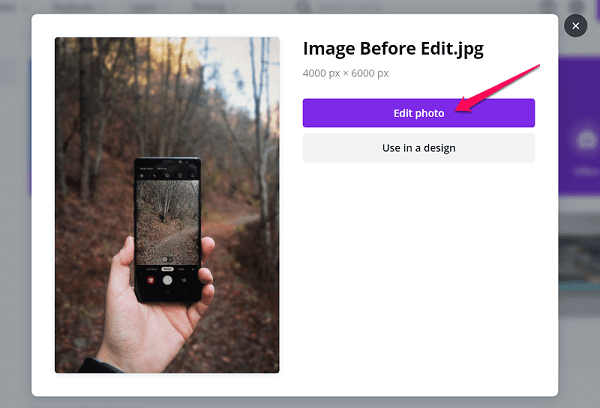
Step 4 Now at this point you’ll need to click the Edit photo button.

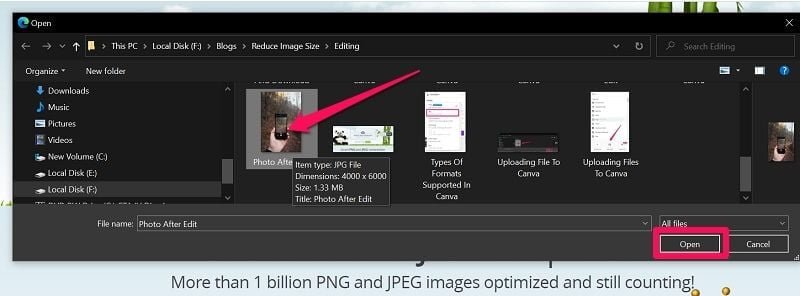
Step 5 After clicking on the Edit photo button, the file explorer will open. Navigate to the file and click Open.

Step 6 Once the file is uploaded it will be shown upfront with 2 options; click on Edit photo.
Step 7 On the left side you can see all the customization options like Templates, Elements, Uploads, Text, Background, and more. But for the sake of the article, we are not adding anything. At the top, you will find an option to name the file. After that click on the Download button.

Step 8 Here you will find the drop-down button under File Type. Change it from PNG to JPG and click Download.

Step 9 And here is a photo after editing via Canva.
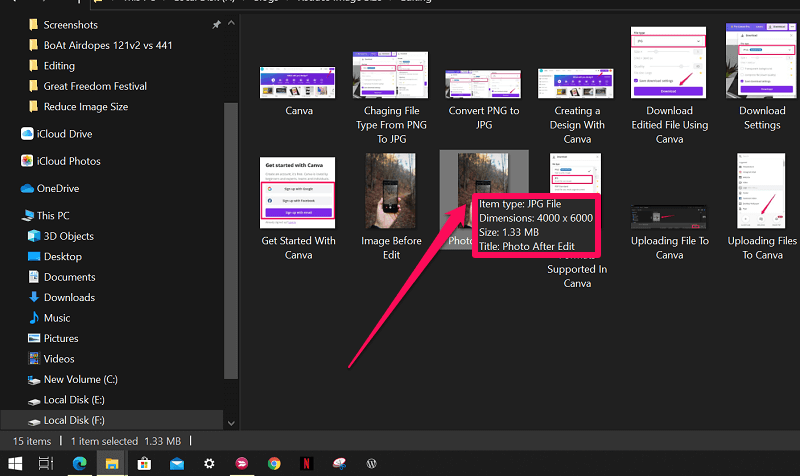
As you can see the reduced image size is now 1.33 MB which was 1.53 MB. Some improvements there! But it’s still not ready to be uploaded to the article. Now you need one more thing for the size conversion.
And that is the Tinypng website. Don’t worry it’s just a matter of 2 clicks.
#2 Reducing Image Size Using Tinypng
- Open the official website and drop your files here or press anywhere on the dotted area.

2. Next you’ll need to browse the file and click Open.
3. The file[s] will begin to load and voila after a few seconds, here’s your file! As you can see, the file that was 1.33 MB has been dropped to 598.8 KB which is exactly 58% less than the edited version of Canva.
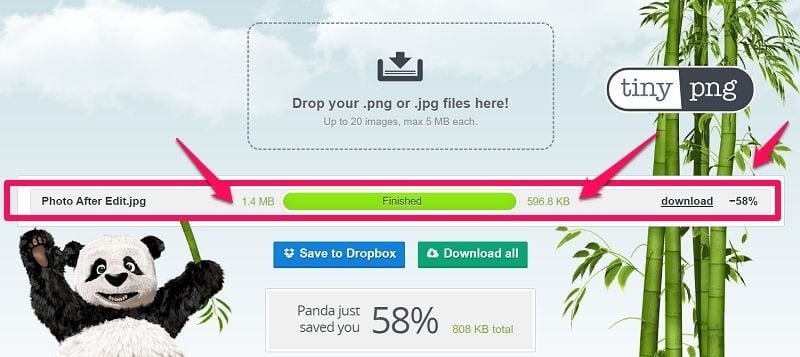
The best part about Tinypng is that you can compress 20 images below 5MB for free without signing in or inappropriate ads on the website on a session. You can always refresh the website and upload the next 20 photos.
But Image is Still Heavy For The Website Blog?
I get it. Uploading a photo of around 600 kb is not good for your website. Why? because it’s not going to be the only image in the article. There will be 5 to 10 more images which will make the page very slow to load.
To rectify this issue, there is a solution and you have it readily available on Mac and Windows computers. And that the default photo editor i.e. MS Paint on Windows and Photo Editor on Mac. For Ubuntu here is our detailed article on reducing image size using GIMP Image Editor.
Rest you need Canva and Tinypng.
So How To Reduce Image Size For Website Article?
Okay here’s the thing; Never directly upload the 5MB+ photos from your DSLR to your website. It also doesn’t make sense to upload a image with 4000 px plus of a resolution.
This will not only make the webpage heavy but also will increase the page loading time. Hence the Google Page Index will go bonkers in a bad way. To avoid this scary situation, you need to lower the resolution of the photos. For example, the file in this experiment is 1.55 MB.
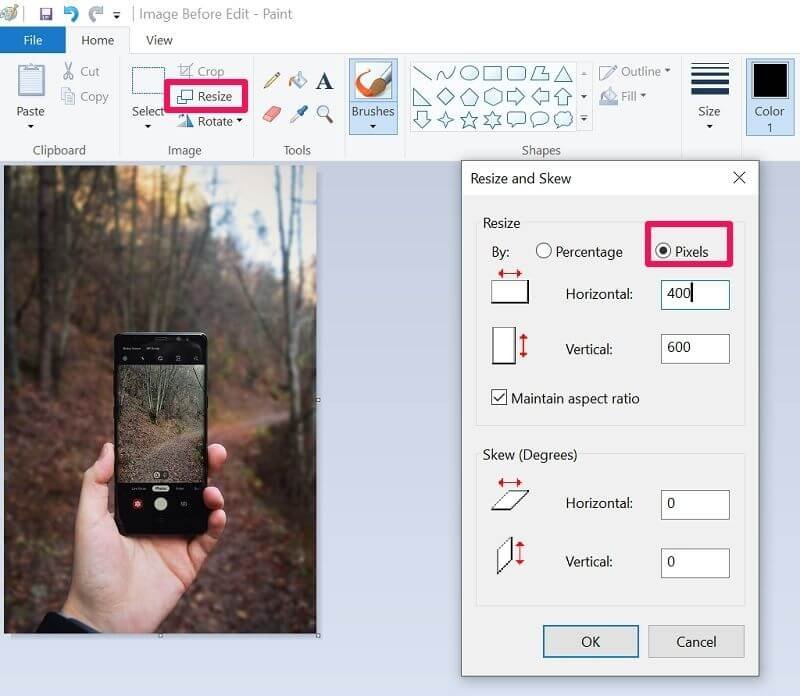
As per my experience, the ideal landscape photo should be 800px, and the portrait at around 300px to 400px. For Landscape images (since they will be wider) a change is needed in the width while making no change in the vertical or height.
Whereas, on a portrait shot, the height should be kept at 300 or 400px while making no changes to the width as it will be automatically set by the photo editor in a good aspect ratio.
Since the photo I am using is a portrait shot, I am resizing it to 400 px using MS Paint. Click on Resize. Under Resize and Skew on the Horizontal option choose either 300 or 400. This will make sure how small and lightweight the photo will become.
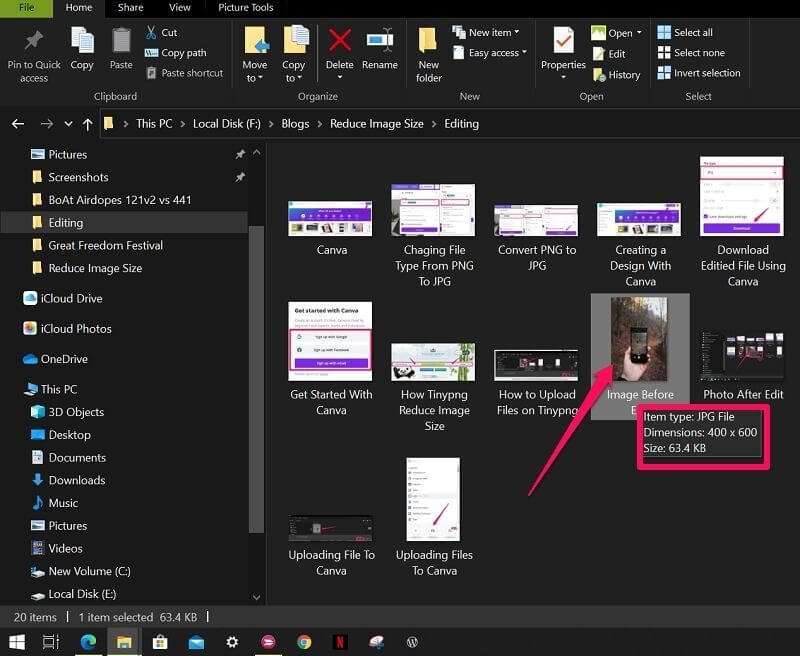
By doing so, the photo will certainly shrink in size & weight. In the below image properties, you can see the difference. The photo has been reduced to just 63 KB!
That’s not all, you can now upload the photo[s] on Canva and download it again as a PNG file. Then upload the photo edited in Canva, on Tinypng, and drop the file size even further!
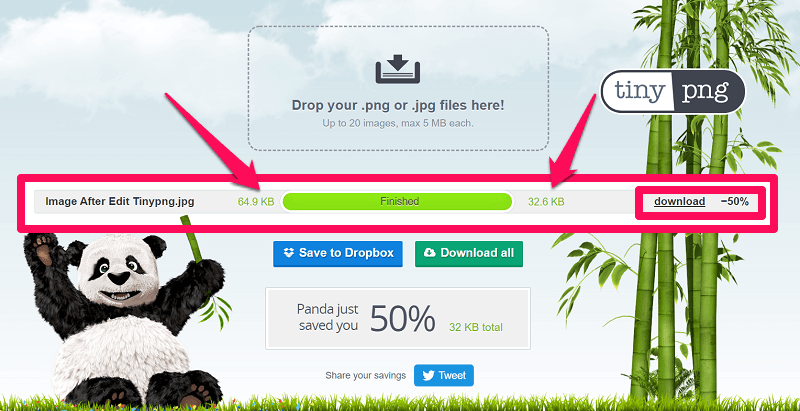
Voila! A photo that was 1.53 MB was reduced to just a mere 32.6kb! You must be thinking it might not look good. Well, that’s not the case! Have A look yourself!
We are Wrapping up!
There you go, guys! These are the 3 things I do to reduce the image size by 80% or more and speed up your article loading speed. You can use these points in the next articles and speed up the website for free.
So give these points a shot and let me know if you found them of any help. If you did, then certainly share with your friends!
Do you have any queries? Then reach out on the below social accounts. We would love to help you!
Like this article, you can find other interesting tips and tricks, comparisons, reviews and so much more. Click now!
F.A.Q
Can size of images be reduced?
Yes, you can change the image size as needed. It can be done in many ways and here we’ve explained 3 methods that we use to edit our images and are totally free and always works! Tap now to learn more.
How to Reduce Image Size on Any Operating System?
On any Operating system, you can edit images to reduce their size. Since we play around with a lot of machines running different OS we have explained 3 methods that work on any OS and deliver results for free. Tap now to learn more.
Can we Reduce Image Size by 80%?
Yes, you can go even higher for about 90% with a little noticeable difference in the image! We’ve talked about 3 methods that can help you achieve that. Tap now to learn more.